
Deploying Face Mask Classifier on Heroku: Deploy on Heroku
I might stop writing new blogs on this site so please visit dataqoil.com for more cool kinds of stuff.
This is a part 2 of a blogging series.
- Part 1: Deploying Face Mask Classifier on Heroku: Building a Classifier
- Part 2: Deploying Face Mask Classifier on Heroku: Deploy It
Contents
Deploying Face Mask Classifer: Using Streamlit and Heroku
This is hard times for everyone due to COVID-19. And even while dialing someone, now our Telicom suggests us to use mask whenever we come out of our room. Yeah and then some really great engineers started to think about making a system which can classify the face mask. And from few weeks, my LinkedIn feed was full of these projects. So I tried to do it myself also.
Streamlit
Streamlit must be the most easiest way to make our ML models cool, it helps us to easily make ML apps.![]()
Heroku
Heroku is a platform as a service (PaaS) that enables developers to build, run, and operate applications entirely in the cloud. For us, we will deploy our streamlit app on the Heroku and then make it live.

Making Things Ready
- Signup for Heroku and create a first ever Heroku app. Give it a proper name and hold on.
- Make Virtual Environment and activate it. For easier, make a main root folder and underthere make a virtual environment.
- Install streamlit, opencv, tensorflow, numpy, matplotlib.
pip install tensorflow==2.0.0
pip install streamlit==0.62.0
pip install numpy==1.16.5
pip install pillow==6.2.0
pip install opencv-python-==4.2.0.32
- Make a project folder under root folder and add face haarcascade to project folder. It usually is under the
dir_to_venv\Lib\site-packages\cv2\data - Add face mask classifier model to project folder.
- Make a file named main.py under project folder.
Now root structure should look like below
- projct_dir
- haarcascade_frontalface_default.xml
- customCNN64.h5
- main.py
- name_of_venv
Main.py
Import Dependencies
- We need streamlit to handel some web tasks.
- PIL to do some Image processing tasks.
- NumPy for array operations.
tensorflow.keras.moderl.load_modelto load saved model.- OpenCV to do face detection.
- OS to do some file locating task.
import streamlit as st
from PIL import Image, ImageOps
import numpy as np
from tensorflow.keras.models import load_model
import cv2
import os
Model Loader
Loading a model is most essential for us and it is the best way to load a model once per execution because loading model on each user request is time consuming.
def model_loader(model_dir):
    loaded_model = load_model(model_dir)
    print("Loaded model from disk")
    return loaded_model

dir = os.path.dirname(os.path.realpath(__file__))+"/"
model=model_loader(model_dir=dir+"customCNN64.h5")
face_cascade = cv2.CascadeClassifier(dir+'haarcascade_frontalface_default.xml')
- Our trained model is loaded and we also loaded our face cascade.
A Classifier
Since we have loaded our model, its time to make a method to do classification task. Pass a face image and model to this method and then this method will return the prediction and accuracy. But one major step is to make this image like the image we used on training. i.e. image with same size/shape as train image and same scaling also(0 t0 1 or 0 to 255).
def classifier(image, model):
    shape=model.input_shape
    shape = shape[1:3]
    img = cv2.resize(image, shape)
    img = img.reshape(1, shape[0], shape[1], 3)/255
    acc = model.predict(img)
    prediction = np.argmax(acc)
    classes = ["Mask", "Unmasked"]
    res = classes[prediction]
    acc = acc[0][prediction]
    acc = round(acc, 4)
    return res, acc
A Face Detector
We have already prepared a face cascade which allows us to detect faces on image. Now is the time to make a method that performs this task.
- Take an image and face_cascade.
- Convert image to grascale because grayscale is expected to find faces on.
- If faces found, then proceed else set result to nothing found.
- For every faces:
- Take bounding box and make it bit large bu adding some value.
d=20on my case. - Crop a face image from RGB image and pass it to classifier.
- Attach the result to some string. We will show this on frontend later.
- When person is masked, show green bounding box, else show red bounding box. Note that OpenCV’s default color channel is BGR and we will pass an RGB image inside this method so the red color will be (255, 0, 0).
- Add some text above the bounding box.
- Take bounding box and make it bit large bu adding some value.
- Return image and result.
def face_detector(image, face_cascade):
    shape=image.shape
    gray=cv2.cvtColor(image, cv2.COLOR_RGB2GRAY)
    faces = face_cascade.detectMultiScale(gray, scaleFactor=1.2, minNeighbors=5)
    if len(faces)>0:
        result = ""
        d=20
        for i in range(0, len(faces)):
            (x, y, w, h) = faces[i]
            y = np.clip(y-d, 0, y)
            x = np.clip(x-d, 0, x)
            w = np.clip(w+2*d, w, shape[0]-w-2*d)
            h = np.clip(h+2*d, h, shape[1]-h-2*d)
            face_img = image[y:y + h, x:x + w]
            res, acc = classifier(face_img, model)
            result += f"Person {i}: {res} || Accuracy:{str(acc)[:4]} \n"
            color = (0, 255, 0)
            if res == "Unmasked":
                color=(255, 0, 0)

            res = f"Person: {i} {res}"
            cv2.putText(image, res, (x,y), cv2.FONT_HERSHEY_SIMPLEX, 1, color, 2, cv2.LINE_AA)
            cv2.rectangle(image,  (x, y), (x + w, y + h), color, 2)
    else:
        result="Nothing found."
    return image, result
Prepare Streamlit
We don’t have to write vast codes for this task.
st.writeallows us to write text on frontend. It also follows some markdown formatting.st.file_uploaderallows us to upload files and also set types allowed.- If file is not uploaded, request user to do it.
- Else:
- Read image, it will be on original compressed format.
- Show that image by
st.image() - Convert image to RGB and pass it to face detector detector.
- Write results and show the newly image where face has been localized.
st.write("""
         # Face Mask Classifier Using Streamlit
         """
         )
st.write("A Simple Web App to do face mask classification.")
file = st.file_uploader("Please upload an image file", type=["jpg", "png"])

if file is None:
    st.text("Please upload an image file")
else:
    image_data = Image.open(file)
    st.image(image_data, use_column_width=True)
    img = image_data.convert("RGB")
    image, result=face_detector(np.asarray(img), face_cascade)
    st.write(result)
    image = Image.fromarray(image)
    st.image(image, use_column_width=True)
Test it locally
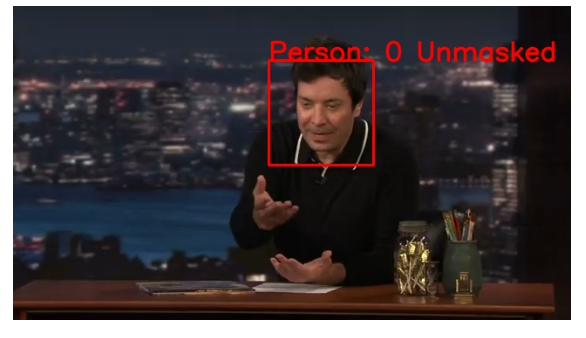
In order to test it locally, make sure the terminal is on same directory as project is, and also make sure environment is activated. Then streamlit run main.py will opens some port for us. If the browser window doesnt’ pops up automatically copy and run the localhost link. The result should look like below.

Deploy on Heroku
Before deploying onto heroku, we need to have our some files ready. Our Project structure should be like below.

Requirements.txt
So from your working project directory, with virtual environment still running, do pip freeze>requirements.txt or you can make a file named requirements.txt and add below code under that file.
tensorflow==2.0.0
streamlit==0.62.0
numpy==1.16.5
pillow==6.2.0
opencv-python-headless==4.2.0.32
Procfile
A file to instruct what a Heroku should do/run on what file. Make sure the name of this file is same as Procfile. This file should include below code.
web: sh setup.sh && streamlit run main.py
We are using web app, then sh is shell command to run shell file. streamlit run main.py is what we used to run app locally and this also runs the app on Heroku.
setup.sh
A shell file. It is used to do some task like making a temp folder for to store some flags. Everyone knows mkdir is to make a directory. Make sure to do copy paste.
mkdir -p ~/.streamlit

echo "[server]
headless = true
port = $PORT
enableCORS = false
" > ~/.streamlit/config.toml
You need to have active heroku account. Then go to new app or create new app.

- Give your app a proper name.
- Then you might see the web page like below.

- Now download the Heroku cli and install it.
- Login to the Heroku.
- Run terminal (using git bash is always a great idea), under the project folder:
git init heroku git:remote -a proj_name_used_on_heroku - Add everythin on repository and commit it and push it.
git add . git commit -am "make it better" git push heroku master - Wait few minutes to be deployed on Heroku. Don’t forgot to check logs of deployment.
Possible Errors
Sometimes lots of errors occurs while deploying and one of popular is file size exceeding.
- Heroku allows only 500MB of files. And your file is exceeding. Make sure to use few requirements and few files.
- Access not available to push. May be the app name on Heroku and remote is different.
- May be Procfile have errors.
- May be there is error on shell file.
If there is not any errors, try to open the app. And if no errors are there, then it takes some time to load.
Demo


Why not read more?
- Gesture Based Visually Writing System Using OpenCV and Python
- Gesture Based Visually Writing System: Adding Visual User Interface
- Gesture Based Visually Writing System: Adding Virtual Animationn, New Mode and New VUI
- Gesture Based Visually Writing System: Add Slider, More Colors and Optimized OOP code
- Gesture Based Visually Writing System: A Web App
- Contour Based Game: Break The Bricks
- Linear Regression from Scratch
- Writing Popular ML Optimizers from Scratch
- Feed Forward Neural Network from Scratch
- Convolutional Neural Networks from Scratch
- Writing a Simple Image Processing Class from Scratch
- Deploying a RASA Chatbot on Android using Unity3d
- Naive Bayes for text classifications: Scratch to Framework
- Simple OCR for Devanagari Handwritten Text


Comments