
Gesture Based Visually Writing System Using OpenCV and Python
This is the first part of Gesture Based Visually Writing System.
- Gesture Based Visually Writing System Using OpenCV and Python
- Gesture Based Visually Writing System: Adding Visual User Interface
- Gesture Based Visually Writing System: Adding Virtual Animationn, New Mode and New VUI
- Gesture Based Visually Writing System: Add Slider, More Colors and Optimized OOP code
- Gesture Based Visually Writing System: Building a Web App Using Flask
Contents
- Before Starting
- Motivations
- How come?
- Inspiration
- Prerequisites
- Introduction
- Problem Statement
- Segmentation of Hand Region
- Background Subtraction
- Mask Generation
- Contour Extraction
- Writing Canvas Generation
- Implementation
- Adding Modes
- Bonus Part
- Where From Here?
- Lets Connect
Before Starting
Huge credit goes to the pandemic COVID19 and without it, I would have not been unemployed and the thoughts of writing this blog wouldn’t have appeared. Also the climate change, due to which I usually have blackouts.
Motivations
We have seen decades of AI revolutions and from Deep Blue chess to Dota playing agents. We are in a competition of achievements. Years ago, there were HOG methods and there was nothing like YOLO or RCNN and the world of Computer Vision today is hungry to find new methods. There are many researchers and academics working continuously to make more AI based systems and the world of Cloud Services has granted huge advantages. The world of Open Source has been so great that we can almost get everything’s code. Now the program can complete our sentences, drawings, can itself talk and many more. The list goes on.
How come?
Let’s describe how I am writing this article now?
I was stuck in a village with no internet and electricity and I was planning on Region-Based method for Corn Infection detection then I started to write using paper and pen. Please follow below links about how I am doing(or will be did?) it. The thought of what if? came. What if we can just move our hand on air and we are actually able to write something? Then rest is on this blog.
I am doing below tasks currently but some unpredicted electricity problems are affecting me.
- Corn Infection Classification: Took 3k+ corn images and did classification using some standard models.
- Corn Infection Detection: Using Region Based Methods to successfully detect infected parts of corn leaves.
- A Chatbot Applications using Unity and RASA: Using Chatbot Framework RASA and Unity3d to make GUI based applications.
- RNN from Scratch: Writing my own RNN library from scratch.
- A Simple Autoencoder From Scratch: Using FFNN from scratch to create an Autoencoder.
Inspiration
This blog post is inspired by the following articles and I have copied some contents also, so I am giving credits to the authors.
- Hand Gesture Recognition using Python and OpenCv The author of this article has made gesture recognition so simple that it made me complete the drawing system within a few hours. Honestly, the part of hand contour extraction is inspired from this blog.
Prerequisites
For understanding the things going on here, basic Image Processing concepts can work well. For the coding part, understanding of NumPy, Matplotlib and OpenCv will be enough. For NumPy and Matplotlib, you can always checkout this awesome repo of Mr. Tarry Singh. And for OpenCv, documentation is great and don’t forget to checkout PyImagesearch. Also the book Image Operators Image Processing in Python by Jason M. Kinser is a great book to understand Image Processing from scratch. This book takes a guide from basic image formation to advanced topics like segmentation.
Introduction
Computer Vision has been an area of interest for years. Different competitions have given us new concepts and ideas. Also there has been lots of work on Gesture Recognition and Sign Language Recognition. Gesture Recognition is not an easy task because of the complexity of image formation and the noise on image. The extraction of the hand from the image is another problem. There has been various research to do segmentation of image and one method to do so is selective search(Used on RCNN Family and I am using this method to do Region Proposal on another blog.)
Problem Statement
We need to extract the hand gesture from the image first and then checkout for the movement of the hand. (For simplicity I am making this blog work for any object movements. But for advanced and more robustness, we must recognize the hand and draw only then.) The problem is so simple that it can be divided onto below steps:-
- Read the frame from the image and extract the hand region.
- Draw a pointer on the top of the hand region and draw the pointer on canvas along with the pixels.
- When the character is drawn on the canvas, send the character to the classification model.
The objective of this blog is to successfully create a Gesture Based Writing System while explaining all major tasks on the way.
Also checkout for the bonus topics(there is always some interesting going on).
Segmentation of Hand Region
For this particular problem, the hand will be the foreground and the other remaining things are the background. Our task will be to find the exact position of the hand. But how can one do that? The simple but tricky concept here is known as Background Subtraction. OpenCV’s fast and powerful functionalities allow us to do this operation in a realistic scenario. The background subtraction is done for each sequence of frames.
Background Subtraction
The concept of background subtraction is so simple, we take an image which has only a background, then take an image with the same background image. Then subtract those two images, what will you get? Let’s see the code in action.
- First define a good show method.
- And run camera, capture foreground/background images
- Show differences.
def show(img, figsize=(10, 10)):
    figure = plt.figure(figsize=figsize)
    plt.imshow(img)
    plt.xticks([])
    plt.yticks([])
    plt.show()

cap = cv2.VideoCapture(0) #run camera with device
imgs = [] #list to hold frames
while len(imgs) < 2: #while we captured one foreground and one background image
    ret, frame = cap.read() #read each frame
    frame = cv2.flip(frame, 1) #flip the frame for anti-mirror effect
    key = cv2.waitKey(2) #wait for 2sec to check user key strike
    if key == 32: #if key is space then show the frame, append it to our list
        show(frame)
        imgs.append(frame)
    cv2.imshow('Running Frame', frame) #keep showing our current frame
    if key == 27 & 0xFF: #when escape key is pressed, exit
        break
cap.release() #release the camera and destroy windows
cv2.destroyAllWindows()
show(imgs[0]-imgs[1]) #background subtraction
The result of this code will not be great but lets see them in the image.
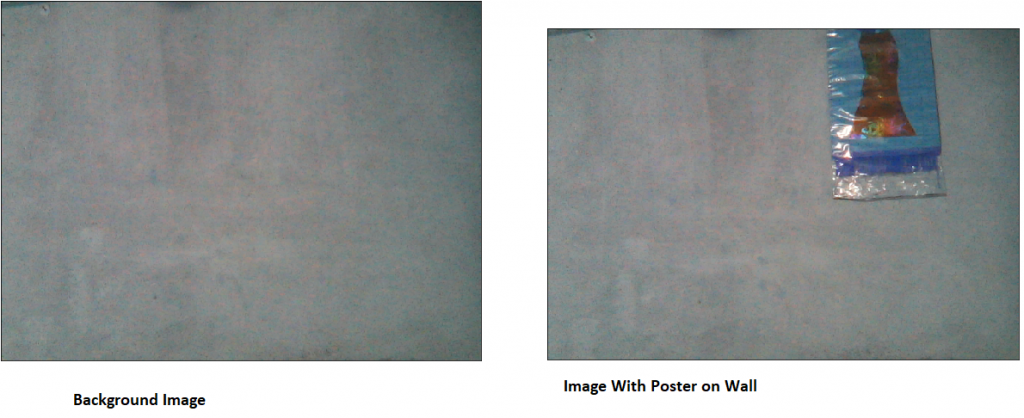
The only difference I am using on these images is the pamphlet on the wall. The final difference image doesn’t look like any difference but some noises. This is because of the image quality and noise effect, we can always remove these noise by some factor later. OpenCV reads images in BGR format and it still is on BGR. The difference on the image shows that the object on the wall was not on the background image but is present on the new image hence its color will be different than others and it will be easy to recognize them. Hence the object is foreground and the result will be called the mask.
For better performance, we will use the concept of running average. We will run our system idle for some frames and then take average from it. We will make an average background. Then will do the absolute subtract. Also using RGB/BGR image on background subtraction only increases the complexity, so we will use the Grayscale image or ROI.
Mask Generation
The mask is something that holds the foreground. In general, the difference image in the above image also contains some sort of mask on the place where the object is present. The mask is generated by doing absolute subtraction of the current frame with average background and then doing thresholding. The actual mask will contain black on the unwanted region and white on our hand region. This is a pretty simple idea, we are subtracting the background with a background image that contains the hand, the difference will only be on the hand region and all other parts will be black(RGB (0, 0, 0)).
Thresholding is the concept where pixels are grouped into one of two groups by comparing pixels with thresholding values. There are various thresholds, most simple is Binary and others are Otsu, Inverse Binary etc. Let’s see the code on the action.
diff = np.abs(cv2.cvtColor(imgs[0], cv2.COLOR_BGR2GRAY)-cv2.cvtColor(imgs[1], cv2.COLOR_BGR2GRAY))
_, th = cv2.threshold(diff, 150, 255, cv2.THRESH_BINARY)
show(th)
Thresholding the difference of gray images will give us a mask. The value will be 0 if it is less than 150 and will be 255 if it is greater than 150. The result is great but not as we expect it to be.
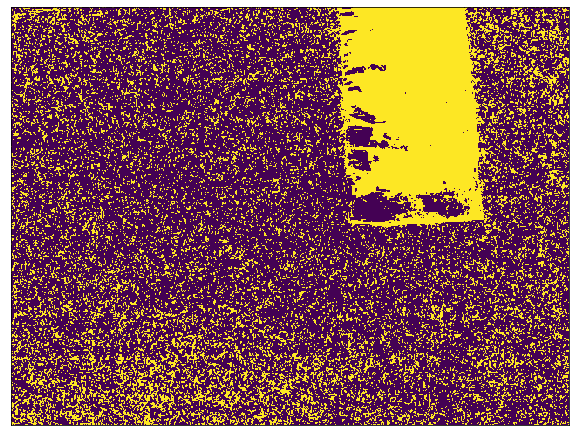
The mask is generated for each and every frame(except averaging frames).
Contour Extraction
The mask on the above image looks weird because it is full of noise and my room is not that lighty. Lesser the noise, the easier the task becomes. The contour is the outer region where an object is located. In our case the contour must be around the hand. But because of the noise, we might have multiple contours and also can we hold our still? Also the shadows can affect. The contour with the largest area is our hand region.
Contour is the outline or bounding curves around the boundary of an object located on an image.
Lets find the contour on above image, can we find the region where the poster is placed?
(cnts, _) = cv2.findContours(th.copy(), cv2.RETR_EXTERNAL, cv2.CHAIN_APPROX_SIMPLE)
segmented = max(cnts, key=cv2.contourArea)
cv2.drawContours(imgs[0], [segmented], -1, (0, 0, 255))
show(imgs[0])
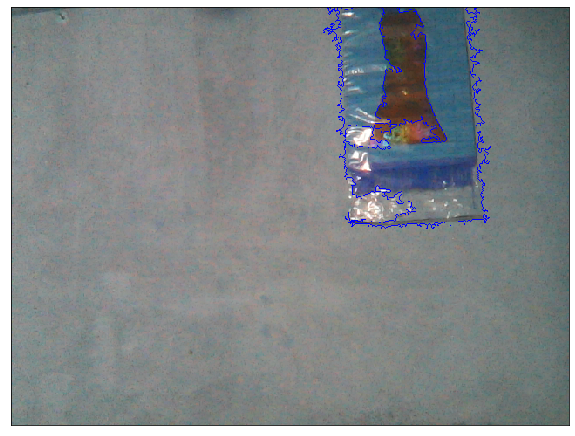
Well, so far so good. Please ignore the color channel on this image because I am using BGR color space. But we did a pretty great job or OpenCV did?
Writing Canvas Generation
The canvas is something where we can write here. So for simplicity, it will be like a whiteboard. But in image processing, it will be black image.
Why black image?
The pixel value of black is [0, 0, 0] so we can do addition without affecting any pixels. The addition here will be what we call writing. Complete black image is like an addition identity image. Thanks to NumPy we can make the complete black image into white just by adding 255.
The basic idea behind writing is to find the top of our contour. Draw a pointer on that position on frame(it will be like we are seeing where our hand is moving). And on the canvas, also make a pointer on the same position, change the color on the place where the pointer is present. The image we will use for operations is black but what we will show is white so we will do some weird operations. Also using OpenCV we can control the camera with our keys, so we can make different modes of pointer. For simplicity, I am making some modes:
- Write:- It will add pixels on the canvas.
- Erase:- It will remove the written pixels from the canvas. It is tricky but works fine. Since our background is white, we will make every pixel white where the pointer resides in this mode.
- Idle:- Neither write nor erase.
- Erase All:- Erases the canvas to make it clean.
- Restart All:- Erases the canvas along with the average image. New Average is taken.
Implementation
Background Preparation
We will start by assuming what the background will be for our case. We will do a running average for up to some frames and only then do other processes.
import cv2
import imutils
import numpy as np
import matplotlib.pyplot as plt
def running_average(bg_img, image, aweight):
    if bg_img is None:
        bg_img = image.copy().astype("float")
    else:
        cv2.accumulateWeighted(image, bg_img, aweight)
    return bg_img
A mathematical formula is:- \begin{equation}\label{eq:} dst(x, y) = (1-\alpha) * dst(x,y) + \alpha * src(x, y) \end{equation}
dstis destination image or accumulatorsrcis source image𝛼is the weight of the input image and decides the speed of updating. If set small, average is taken over large number of frames.
Here the source is image and the destination is bg_img.
Preparing Parameters and Variables
aweight = 0.5 #accumulate weight variable
cam = cv2.VideoCapture(0) # strat the device camera
top, right, bottom, left = 250, 400, 480, 640 # ROI box
num_frames=0 # count frame
canvas = None # writing canvas
t=3 # thickness
draw_color = (0, 255, 0) # draw color(ink color)
pointer_color = (255, 0, 0) # pointer color
erase = False # mode flag
take_average=True # flag to indicate take average
bg_img=None #bg image
Please follow the comment written right to the code line for explanation.
Running the Camera
while True: # loop while everything is true
    (ret, frame) = cam.read() # read the camera result
    if ret: # if camera has read frame
        key = cv2.waitKey(1) & 0xFF # wait for 1ms to key press
        frame = imutils.resize(frame, width=700)
        frame = cv2.flip(frame, 1) # flip to remove mirror effect
        clone = frame.copy() # clone it to not mess with real frame
        h, w = frame.shape[:2]
        roi = frame[top:bottom, right:left] # take roi, to send it onto contour/average extraction
        gray = cv2.cvtColor(roi, cv2.COLOR_BGR2GRAY) # roi to grayscale
        gray = cv2.GaussianBlur(gray, (7, 7), 0) # add GaussianBlur to eliminate some noise
Since we have chosen our device camera from cv2.VideoCapture(0), we will read the frames next. When the camera is not working properly, the ret becomes False. Also we want our system to continuously check for user input, so we will do cv2.waitKey(1) & 0xFF. The original frames will have to be flipped in order to make it realistic. We can do that by flipping on the x-axis using cv2.flip(frame, 1). Then we crop the ROI from the given box and convert it into Grayscale. Grayscale is much more efficient at doing thresholding processes. Then we added some Gaussian blur of shape (7, 7). Some kind of Convolution Operation happens inside that function. If you want to learn about Convolution operation from Scratch then follow the link below.
Take Average of ROI Background
        if num_frames < 100 and take_average == True: # if to take average and num frames on average taking is lesser
            bg_img = running_average(bg_img, gray, aweight) # perform running average
            cv2.putText(clone, str(num_frames), (100, 100),
                                   cv2.FONT_HERSHEY_SIMPLEX, 0.5, (0, 0, 255), 5) # put frame number on frame
            num_frames += 1
        else: # if not to take average
            num_frames = 0
            hand = get_contours(bg_img, gray) # take our segmented hand
            take_average=False
        cv2.rectangle(clone, (left, top), (right, bottom), (0, 255, 0), 2) # draw a ROI
        cv2.imshow("Feed", clone) # show live feed
        if key==27: # if pressed  escape, loop out and stop processing
            break
cam.release()
cv2.destroyAllWindows()
Next, we check the flag if we had to take average or not, if we do want to find average still, then put frame number on the frame. Else we get contours from our image. Finally, we draw a rectangle as ROI on live feed and if the user enters the escape key then stops the process.
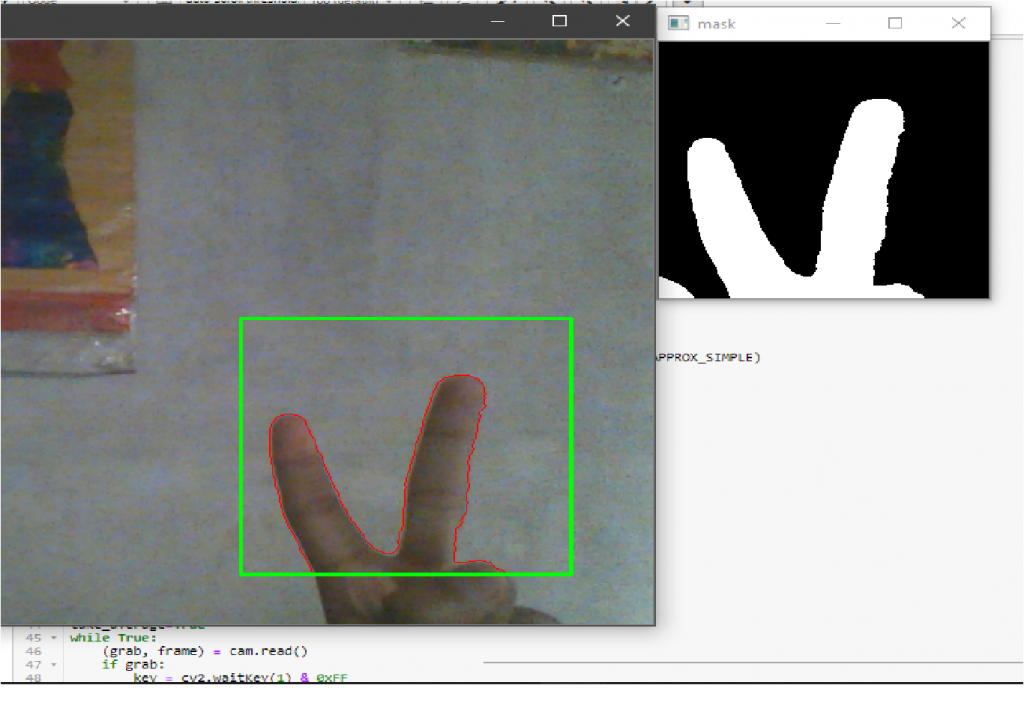
Get Hand Contours
Next we do find our contours on the current frame, this is done by taking the absolute difference between average background image and current frame, then doing thresholding.
def get_contours(bg_img, image, threshold=10):
    diff = cv2.absdiff(bg_img.astype("uint8"), image) # abs diff betn img and bg
    _, th = cv2.threshold(diff, threshold, 255, cv2.THRESH_BINARY)
    (cnts, _) = cv2.findContours(th.copy(), cv2.RETR_EXTERNAL, cv2.CHAIN_APPROX_SIMPLE)
    if len(cnts) == 0:
        return None
    else:
        max_cnt = max(cnts, key=cv2.contourArea)
        return th, max_cnt
The function takes the background image, current frame and the thresholding value. It returns the thresholded image and the largest contour.
Drawing Contours and Showing Thresholded image
    ........................
    ........................
    else: # if not to take average
        num_frames = 0
        hand = get_contours(bg_img, gray) # take our segmented hand
        take_average=False
        if hand is not None:
            thresholded, segmented = hand
            cv2.drawContours(clone, [segmented+(right,top)], -1, (0, 0, 255))
            cv2.imshow("mask", thresholded)
The contours returned are from the ROI image which is the cropped version of the original frame. Hence we have to add the starting position of the ROI box to correctly draw contours on the original frame. I hope the image just looks like the one below’s.
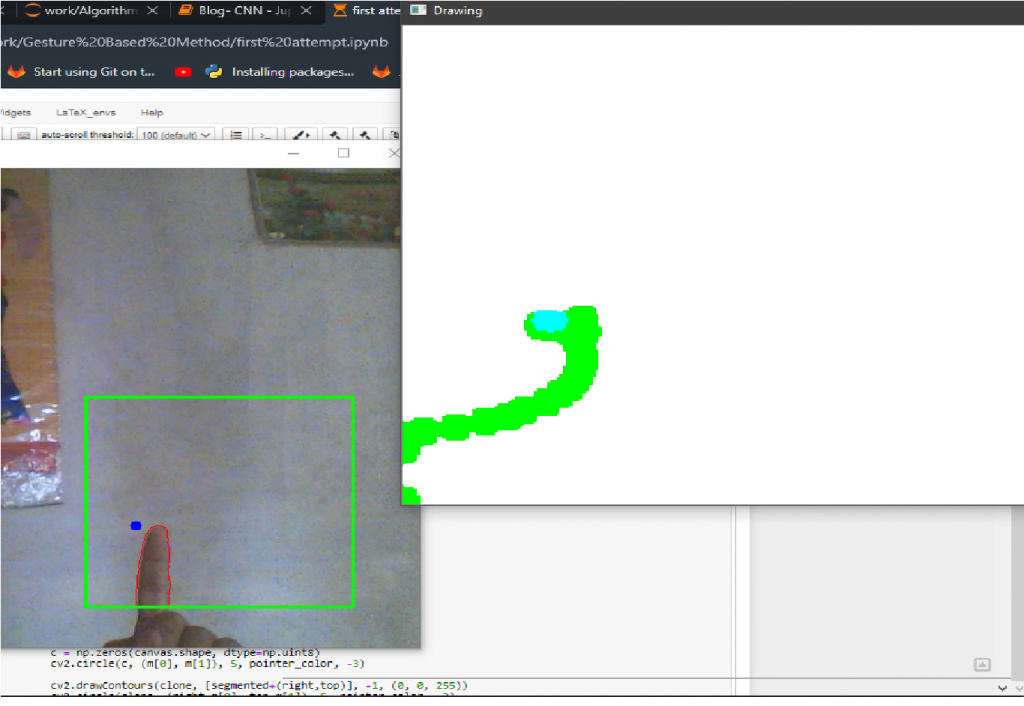
Draw Pointer on Canvas
    .......................
    .......................
    else: # if not to take average
        num_frames = 0
        hand = get_contours(bg_img, gray) # take our segmented hand
        take_average=False
        if hand is not None:
            thresholded, segmented = hand
            cv2.drawContours(clone, [segmented+(right,top)], -1, (0, 0, 255))
            cv2.imshow("mask", thresholded)
            tshape = thresholded.shape
            sshape = segmented.shape
            new_segmented = segmented.reshape(sshape[0], sshape[-1])
            m = new_segmented.min(axis=0)
            if type(canvas) == type(None):
                canvas = np.zeros((tshape[0], tshape[1], 3))+255
            c = np.zeros(canvas.shape, dtype=np.uint8)
            cv2.circle(c, (m[0], m[1]), 5, pointer_color, -3)
            cv2.drawContours(clone, [segmented+(right,top)], -1, (0, 0, 255))
            cv2.circle(clone, (right+m[0], top+m[1]), 5, pointer_color, -3)
We want to draw a pointer only inside the ROI box and not outside. And also the contours are found on the cropped ROI image hence we need to add right and top values. The writing canvas is first initialized with zeros and then added 255, thanks to NumPy array broadcasting, hence canvas became completely white. The variable c here is a very important one and it is responsible to show the pointer. The pointer window is equal to the canvas, and the pointer image is 0 on every place except where the minimum position of contour is.
Lets recap:-
- The frame is read and the contours are calculated by taking the absolute difference of current frame with the average background image.
- The contour is drawn on live feed.
- Threshold image is shown.
- The pointer(circle) is drawn on live feed.
- The pointer image, canvas image is prepared.
The pointer should move along with fingers. Please check the code below if your system is not running well.
def running_average(bg_img, image, aweight):
    if bg_img is None:
        bg_img = image.copy().astype("float")
    else:
        cv2.accumulateWeighted(image, bg_img, aweight)
    return bg_img
def get_contours(bg_img, image, threshold=10):
    diff = cv2.absdiff(bg_img.astype("uint8"), image)    # abs diff betn img and bg
    _, th = cv2.threshold(diff, threshold, 255, cv2.THRESH_BINARY)
    (cnts, _) = cv2.findContours(th.copy(), cv2.RETR_EXTERNAL, cv2.CHAIN_APPROX_SIMPLE)
    if len(cnts) == 0:
        return None
    else:
        max_cnt = max(cnts, key=cv2.contourArea)
        return th, max_cnt
aweight = 0.5 #accumulate weight variable
cam = cv2.VideoCapture(0) # strat the camera
top, right, bottom, left = 250, 400, 480, 640 # ROI box
num_frames=0 # count frame
canvas = None # writing canvas
t=3 # thickness
draw_color = (0, 255, 0) # draw color(ink color)
pointer_color = (255, 0, 0) # pointer color
erase = False # mode flag
take_average=True # flag to indicate take average
bg_img=None #bg image
while True: # loop while everything is true
    (ret, frame) = cam.read() # read the camera result
    if ret: # if camera has read frame
        key = cv2.waitKey(1) & 0xFF # wait for 1ms to key press
        frame = imutils.resize(frame, width=700)
        frame = cv2.flip(frame, 1) # flip to remove mirror effect
        clone = frame.copy() # clone it to not mess with real frame
        h, w = frame.shape[:2]
        roi = frame[top:bottom, right:left] # take roi, to send it onto contour/average extraction
        gray = cv2.cvtColor(roi, cv2.COLOR_BGR2GRAY)  # roi to grayscale
        gray = cv2.GaussianBlur(gray, (7, 7), 0) # add GaussianBlur to eliminate some noise

        if num_frames < 100 and take_average == True: # if to take average and num frames on average taking is lesser
            bg_img = running_average(bg_img, gray, aweight) # perform running average
            cv2.putText(clone, str(num_frames), (100, 100),
                                   cv2.FONT_HERSHEY_SIMPLEX, 0.5, (0, 0, 255), 5) # put frame number on frame
            num_frames += 1
        else: # if not to take average
            num_frames=0
            hand = get_contours(bg_img, gray)  # take our segmented hand
            take_average=False
            if hand is not None:
                thresholded, segmented = hand
                cv2.drawContours(clone, [segmented+(right,top)], -1, (0, 0, 255))
                tshape = thresholded.shape
                sshape = segmented.shape
                new_segmented = segmented.reshape(sshape[0], sshape[-1])
                m = new_segmented.min(axis=0)

                if type(canvas) == type(None):
                    canvas = np.zeros((tshape[0], tshape[1], 3))+255
                c = np.zeros(canvas.shape, dtype=np.uint8)
                cv2.circle(c, (m[0], m[1]), 5, pointer_color, -3)
                cv2.circle(clone, (right+m[0], top+m[1]), 5, pointer_color, -3)
                cv2.imshow("mask", thresholded)
                cv2.imshow("c", c)
        cv2.rectangle(clone, (left, top), (right, bottom), (0, 255, 0), 2) # draw a ROI
        cv2.imshow("Feed", clone) # show live feed
        if key == 32:
            cv2.imwrite("Captured.png", clone)
        if key==27: # if pressed  escape, loop out and stop processing
            break
cam.release()
cv2.destroyAllWindows()
Draw on Canvas
                ...................................................
                ...................................................
                cv2.circle(c, (m[0], m[1]), 5, pointer_color, -3)
                cv2.circle(clone, (right+m[0], top+m[1]), 5, pointer_color, -3)
                cv2.imshow("mask", thresholded)
                cv2.imshow("c", c)
                cv2.circle(canvas, (m[0], m[1]), 5, draw_color, -3)
                e = cv2.erode(canvas, (3, 3), iterations=5)
                drawn = cv2.resize(e, (clone.shape[1], clone.shape[0]))
                c = cv2.resize(c, (clone.shape[1], clone.shape[0]))
                drawn_new = drawn+c
                cv2.imshow("Drawing", drawn+c)
What is happening here?
Well, on canvas, in the position where the minimum position of contour is present, we draw a circle of given thickness with a different color than the pointer. The canvas, pointer, thresholded, ROI image all will be of the same size but we want it to be just the same as our live feed, hence we resize it. But why do erosion? Erosion is used here to make the image less noisy or more thick around the drawn circle. The canvas here is an original canvas. And we don’t do anything other than write on it. But we resize the erosion result. Then to show the drawn color and pointer at the same time on canvas, we will sum the canvas with the pointer image. The beauty of black image summing with any image is so awesome here.
Adding Modes
Befor going onto modes, lets first define our keys to do modes and other operations.
escape:- Exit from system.space:- Save current drawing(excluding pointer).z:- Idle mode(move only pointer).x:- Erase mode.c:- Color mode.e:- Erase current canvas but leave the average image.r:- Restart the average and canvas.
Let’s make basic assumptions:-
- If we want to erase, then the position where the current pointer lies must be made white on canvas.
- If we want to move, then the position where the current pointer lies must be left unchanged on canvas.
- Also make the pointer color change on every mode.
Preparing Keys
            ...........................
            ..........................
            if hand is not None:
                if chr(key) == "x": # if pressed x, erase
                    draw_color = (255, 255, 255)
                    pointer_color = (0, 0, 255)
                    erase = True
                if chr(key) == "c":
                    draw_color = (0, 255, 0)
                    pointer_color = (255, 0, 0)
                    erase = False
                if chr(key) == "z": #idle
                    erase = None
                    pointer_color = (0, 0, 0)
                if chr(key) == "r": # restart system
                    take_average=True
                    canvas = None
                if chr(key) == "e":
                    canvas = None
                    drawn = np.zeros(drawn.shape)+255
Above, we are using the flag erase, to do 3 tasks. The pointer color must also be changed per mode.
Erase mode
                ..........................................
                ...........................................
                c = np.zeros(canvas.shape, dtype=np.uint8)
                cv2.circle(c, (m[0], m[1]), 5, pointer_color, -3)
                cv2.circle(clone, (right+m[0], top+m[1]), 5, pointer_color, -3)
                if erase==True:
                    cv2.circle(canvas, (m[0], m[1]), 5, draw_color, -3)
                    erimg=cv2.circle(canvas.copy(), (m[0], m[1]), 5, (0, 0, 0), -3)
                    cv2.circle(c, (m[0], m[1]), 5, (0, 0, 255), -3)
                    e = cv2.erode(erimg, (3, 3), iterations=5)
                    drawn = cv2.resize(e, (clone.shape[1], clone.shape[0]))
                    c = cv2.resize(c, (clone.shape[1], clone.shape[0]))
                    drawn_new = drawn+c
                    cv2.imshow("Drawing", drawn+c)
                    erimg=cv2.circle(canvas.copy(), (m[0], m[1]), 5, (255, 255, 255), -3)
                    cv2.circle(c, (m[0], m[1]), 5, (0, 0, 255), -3)
                    e = cv2.erode(erimg, (3, 3), iterations=5)
                    drawn = cv2.resize(e, (clone.shape[1], clone.shape[0]))
I have scratched my head for hours to make this work right. I hope somebody finds a better way to do this.
- First draw a white color on the pointer position on canvas.
- Draw a black color on the pointer position on a copy of the current canvas.
- Take copy image and erode it, resize it and sum it with pointer image.(if the black color is not used then pointer will not be visible)
- And undo the color operation else the pointer position remains on new images.
Idle Mode
                .....................................................
                .....................................................
                if erase==True:
                    cv2.circle(canvas, (m[0], m[1]), 5, draw_color, -3)
                    erimg=cv2.circle(canvas.copy(), (m[0], m[1]), 5, (0, 0, 0), -3)
                    cv2.circle(c, (m[0], m[1]), 5, (0, 0, 255), -3)
                    e = cv2.erode(erimg, (3, 3), iterations=5)
                    drawn = cv2.resize(e, (clone.shape[1], clone.shape[0]))
                    c = cv2.resize(c, (clone.shape[1], clone.shape[0]))
                    drawn_new = drawn+c
                    cv2.imshow("Drawing", drawn+c)
                    erimg=cv2.circle(canvas.copy(), (m[0], m[1]), 5, (255, 255, 255), -3)
                    cv2.circle(c, (m[0], m[1]), 5, (0, 0, 255), -3)
                    e = cv2.erode(erimg, (3, 3), iterations=5)
                    drawn = cv2.resize(e, (clone.shape[1], clone.shape[0]))
                elif erase==False:
                    cv2.circle(canvas, (m[0], m[1]), 5, draw_color, -3)
                    e = cv2.erode(canvas, (3, 3), iterations=5)
                    drawn = cv2.resize(e, (clone.shape[1], clone.shape[0]))
                    c = cv2.resize(c, (clone.shape[1], clone.shape[0]))
                    drawn_new = drawn+c
                    cv2.imshow("Drawing", drawn+c)
                elif erase == None:
                    canvas_shape = canvas.shape
                    clone_shape = clone.shape
                    eshape = (clone_shape[0]/canvas_shape[0], clone_shape[1]/canvas_shape[1])
                    m[0] = int(eshape[1]*m[0])
                    m[1] = int(eshape[0]*m[1])
                    drawn = cv2.resize(drawn, (clone.shape[1], clone.shape[0]))
                    dc = drawn.copy()
                    cv2.circle(dc, (m[0], m[1]), 10, pointer_color, -3)
                    cv2.imshow("Drawing", dc)
- When
xkey is pressed, erase is true and the first condition runs. - When
ckey is pressed, erase is fale and the second condition runs. - When
zkey is pressed, erase is None and the 3rd condition runs.
In Idle mode, we take the previous drawn image, which is the resized version. We also did some resizing there. In a simple way, we take the copy of the current version of the canvas and draw a pointer above it just to show movement-like features. The showing of movement is just a fooling idea. In fact this overall operation is a fooling idea.
Restart mode
When the key r is pressed, take_average becomes true and the averaging strats.
Erase All mode
When the key e is pressed, drawn is made white. And the canvas is restarted.
Bonus Part
I am going to do Character Recognition on the characters written on the canvas. For that, I will be using the Devanagari Handwritten dataset. For simple Devanagari Handwritten characters, I have written a Detection/Localization or OCR like system years ago using NumPy, Keras and OpenCv. Please follow the below blog post for full contents. The codes and algorithms are not good and I have not got time to improve it. But I used imagination on the coding so years after I still feel proud of that work.
On that repository, contains a file recognition.py, which is responsible for lots of things. So, here I am also using the same file, and it contains the module recognition inside it. Importantly, I am naming that folder as dcr. While doing some work, I am encountering some errors. Those errors are newbie errors telling about not finding saved model directory. Looking into the predictor.py file and doing some path correction solves the problem. In my case, I did:-
.......................
.......................
def prediction(img):
    curr_dir = os.getcwd()+"/dcr/"
    json_file = open(curr_dir+'cnn2/cnn2.json', 'r')
    loaded_model_json = json_file.read()     # load json and create model
    json_file.close()
    loaded_model = model_from_json(loaded_model_json)
    loaded_model.load_weights(curr_dir+"cnn2/cnn2.h5") # load weights into new model
    ..................................
    ..................................
Next let our system fire recognition while pressing s key.
...................................
...................................
                    cv2.imshow("Drawing", dc)
        if chr(key) == "s":
            show(drawn)
            d = drawn.copy().astype(np.uint8)
            r = recognition(cv2.cvtColor(d, cv2.COLOR_BGR2GRAY), 'show')
        cv2.rectangle(clone, (left, top), (right, bottom), (0, 255, 0), 2) # draw a ROI
        cv2.imshow("Feed", clone) # show live feed

The problem with a combination of DCR(Devanagari Character Recognition) and Gesture Writing is only that it doesn’t quite work with words. The reason is the thickness of our writing. So in near future, I will work on that.
Where From Here?
- What about combining this with some LSTMS or RNN models to predict what is user’s next draw might be?
- Adding a GUI like functionalities where we do hand extraction and then whenever we click on a particular region on frame then fire some actions. Like when we show some GUI like area on camera, when a hand is taken above that area then we fire some events, like changing a color, drawing a line or playing a music etc.
Leave me a comment for the entire codes.


Comments