
Building Machine Learning Apps Faster With dstack.ai
Building Machine Learning Apps Faster With dstack.ai
Happy New Year everyone!
This is the second part of the blog I am writing while exploring dstack. In this part, I will focus on an exciting feature offered by dstack which allows you to push and pull ML models from your command line interface, and share it with colleagues or other trusted people using permission management features.
If you are new to dstack, then you can read my previous blog where I introduce dstack by building a simple data app. blog or the documentation.
You find the following when you go to dstack’s documentation:
dstackdecouples the development of applications from the development of ML models by offering an ML registry. This way, one can develop ML models, push them to the registry, and then later pull these models from applications.
In the first part of the blog, we pushed a visualization of Titanic Survival Dataset using dstack. In this part, I will train 3 Classifiers to classify the survival of the person and push this model to dstack. Later I will retrieve the model to my terminal using the pull function from dstack.
Project Structure
I will be using two scripts to demonstrate the dstack ML model registry feature - one for pushing the ML Model and another for Pulling ML Model.
- Root File
- Data
- titanic_data.csv
- titanic_push.py
- titanic_pull.py
- Data
File titanic_push.py
As usual, we start by importing dependencies. In this same file, we will be training 3 classifier models and push them to our Model Registry.
- Decision Tree
- Random Forest
- Gradient Boosting
I am following this blog for training a Model.
import dstack.controls as ctrl
import dstack as ds
import pandas as pd
import matplotlib.pyplot as plt
import random
import numpy as np
from sklearn import datasets, svm, tree, preprocessing, metrics
import sklearn.ensemble as ske
from sklearn.model_selection import train_test_split, ShuffleSplit, cross_val_score

@ds.cache()
def get_data():
    filename = "F:/Desktop/learning/dstack/blog/data/titanic_data.csv"
    return pd.read_csv(filename)

df = get_data()
df = df.drop(['Cabin'], axis=1)
df = df.dropna()

def preprocess_df(df):
    processed_df = df.copy()
    le = preprocessing.LabelEncoder()
    processed_df.Sex = le.fit_transform(processed_df.Sex)
    processed_df.Embarked = le.fit_transform(processed_df.Embarked)
    processed_df = processed_df.drop(['Name','Ticket'],axis=1)
    return processed_df

processed_df = preprocess_df(df)
X = processed_df.drop(['Survived'], axis=1).values
y = processed_df['Survived'].values

X_train, X_test, y_train, y_test = train_test_split(X,y,test_size=0.2)

clf_dt = tree.DecisionTreeClassifier(max_depth=10)
clf_dt.fit (X_train, y_train)
# clf_dt.score (X_test, y_test)
url = ds.push("titanic/decision_tree", clf_dt)
print("Decision tree ", url)

shuffle_validator = ShuffleSplit(len(X), test_size=0.2, random_state=0)
def test_classifier(clf):
    scores = cross_val_score(clf, X, y, cv=shuffle_validator)
    return  scores.mean()
print(f"Decision Tree Acc: {test_classifier(clf_dt)}\n")

clf_rf = ske.RandomForestClassifier(n_estimators=50)
clf_rf.fit (X_train, y_train)
url = ds.push("titanic/random_forest", clf_rf)
print("Random Forest ", url)
print(f"Random Forest Acc: {test_classifier(clf_rf)}\n")

clf_gb = ske.GradientBoostingClassifier(n_estimators=50)
clf_gb.fit (X_train, y_train)
url = ds.push("titanic/gradient_boosting", clf_gb)
print("Gradient Boosting ", url)
print(f"Gradient Boosting Acc: {test_classifier(clf_gb)}\n")
- We start by importing dependencies.
- Make a method to read CSV a file from local storage. Cache that method because we might call that method frequently.
- Drop NULL data, and some non-numeric column names like Cabin, Name, Ticket.
- Preprocess our data a little bit to make it trainable.
- Perform split of data into training set and testing set.
- Train a Decision Tree and push it to
titanic/decision_treeand print its URL. - Train a Random Forest and push it to
titanic/random_forestand print its URL. - Train a Gradient Boosting and push it to
titanic/gradient_boostingand print its URL.
You should be able to see the following in your terminal.
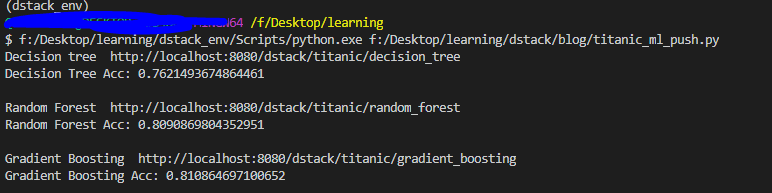
Once you click on the URL whicl leads you to ML Models tab on the left navigation panel, we can see the following:
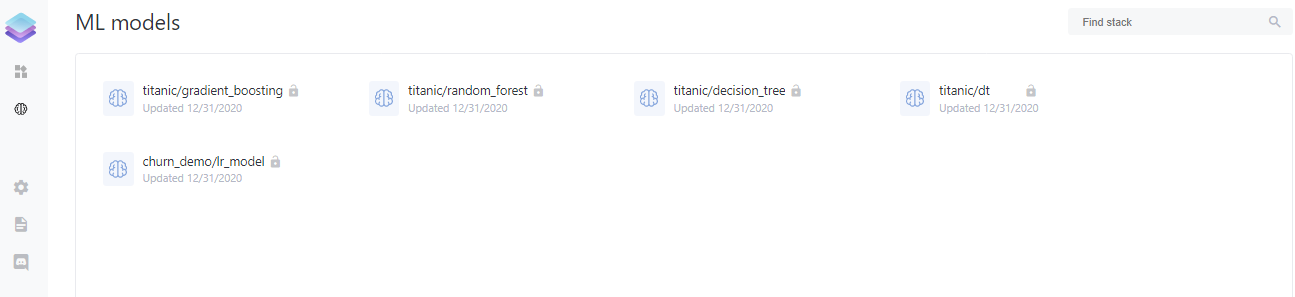
Note that you can see more than one model as I already pushed some models into the registry prior to writing this blog.
If you open the model titanic/gradient_boosting, then you should be able to see your model as below.
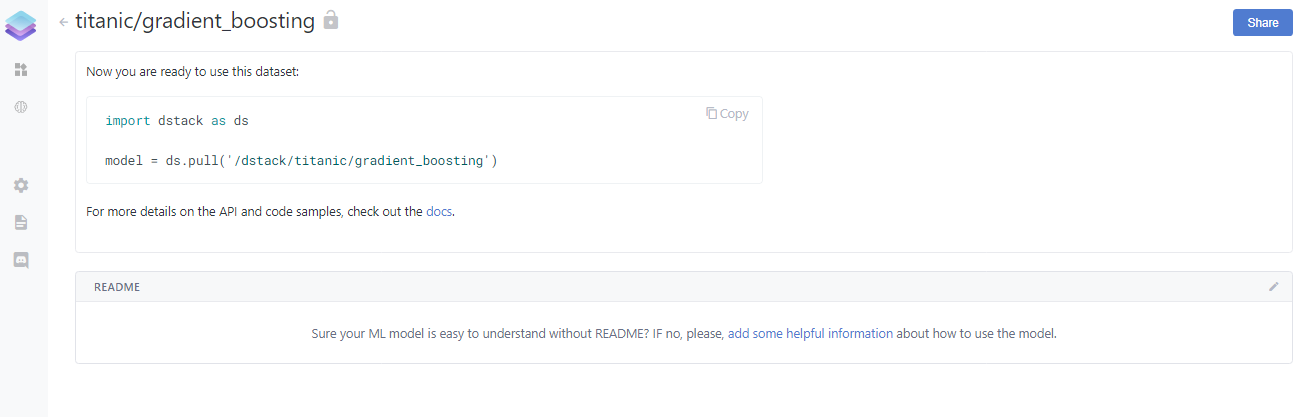
dstack offers a simple documentation feature by allowing to add a readme file on the pushed model. Here we can write about the performance of our model or the use case of our models. I find this feature very useful because I can write about the property of my model in plain text.
File titanic_pull.py
Now that I have a model in the registry, I can pull this model from a python file instead of pulling it from a remote area.
import dstack.controls as ctrl
import dstack as ds
import pandas as pd
import matplotlib.pyplot as plt
import random
import numpy as np
from sklearn import datasets, svm, tree, preprocessing, metrics
import sklearn.ensemble as ske
from sklearn.model_selection import train_test_split, ShuffleSplit, cross_val_score

@ds.cache()
def get_data():
    filename = "F:/Desktop/learning/dstack/blog/data/titanic_data.csv"
    return pd.read_csv(filename)

df = get_data()
titanic_df=df.copy()
titanic_df = titanic_df.drop(['Cabin'], axis=1)
titanic_df = titanic_df.dropna()

def preprocess_titanic_df(df):
    processed_df = df.copy()
    le = preprocessing.LabelEncoder()
    processed_df.Sex = le.fit_transform(processed_df.Sex)
    processed_df.Embarked = le.fit_transform(processed_df.Embarked)
    processed_df = processed_df.drop(['Name','Ticket'],axis=1)
    return processed_df

processed_df = preprocess_titanic_df(titanic_df)
X = processed_df.drop(['Survived'], axis=1).values
y = processed_df['Survived'].values

X_train, X_test, y_train, y_test = train_test_split(X,y,test_size=0.2)

def get_decision_tree():
    return ds.pull("titanic/decision_tree")
def get_random_forest():
    return ds.pull("titanic/random_forest")
def get_gradient_boosting():
    return ds.pull("titanic/gradient_boosting")

def dt_pred():
    dt = get_decision_tree()
    p = dt.predict(X)
    pdf = processed_df.copy()
    pdf["DT Pred"] = p
    return pdf

def rf_pred():
    rf = get_random_forest()
    p = rf.predict(X)
    pdf = processed_df.copy()
    pdf["RF Pred"] = p
    return pdf

def gb_pred():
    gb = get_gradient_boosting()
    p = gb.predict(X)
    pdf = processed_df.copy()
    pdf["GB Pred"] = p
    return pdf

dt_app = ds.app(dt_pred)
rf_app = ds.app(rf_pred)
gb_app = ds.app(gb_pred)

url = ds.push("titanic/dt_pred", dt_app)
print(f"Decision Tree: {url}\n")

url = ds.push("titanic/rf_pred", rf_app)
print(f"Random Forest: {url}\n")

url = ds.push("titanic/gb_pred", gb_app)
print(f"Gradient Boosting: {url}\n")
What is happening above?
- Same as
pushingcode, ourpullingcode starts by importing dependencies. - Read the data from local storage and preprocess it because we will be using this dataset to find out the prediction of our models.
- Make a function to pull each model and return it.
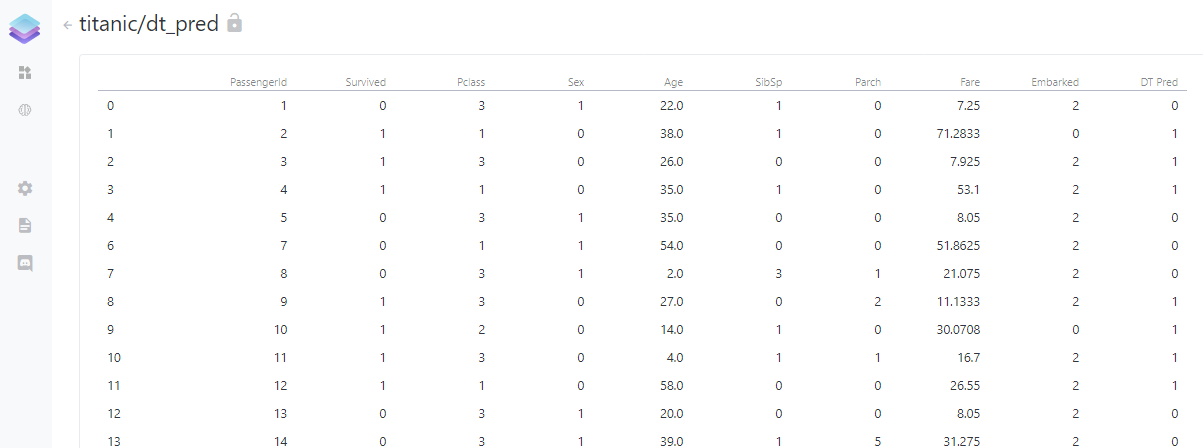
- Make a function to do prediction using the pulled function and then stacking that prediction to a new column of the data frame and return that data frame.
- Make a data app for each of these applications(decision tree, random forest, and gradient boosting).
- Push each application and print its URL.
If everything is right, we can have URLs for each application. You can find the application titanic/dt_pred in the dstack UI.
Finally
I first trained my model, then pushed/pulled some simple classifiers for Titanic Survival Dataset, and stacked their prediction to the new column. If we want to share this model with someone, then we simply can go to share and choose whether we want it to be public or not.
In the next part, I will be writing about training a Tensorflow model and then reusing it. Also, I have not figured out all the cool UI tools that dstack provides, so in the next part, I will try to use them and make a more cool project.
If you reached this line then please leave some comments so that I can improve myself. Also if you have any queries then ping me on LinkedIn as Ramkrishna Acharya.
Why not read more?
- Gesture Based Visually Writing System Using OpenCV and Python
- Gesture Based Visually Writing System: Adding Visual User Interface
- Gesture Based Visually Writing System: Adding Virtual Animationn, New Mode and New VUI
- Gesture Based Visually Writing System: Add Slider, More Colors and Optimized OOP code
- Gesture Based Visually Writing System: A Web App
- Contour Based Game: Break The Bricks
- Linear Regression from Scratch
- Writing Popular ML Optimizers from Scratch
- Feed Forward Neural Network from Scratch
- Convolutional Neural Networks from Scratch
- Writing a Simple Image Processing Class from Scratch
- Deploying a RASA Chatbot on Android using Unity3d
- Naive Bayes for text classifications: Scratch to Framework
- Simple OCR for Devanagari Handwritten Text


Comments