
Build an Image Size Reducer Web App in Python with Streamlit, Pillow, OpenCV, and NumPy
An image size reducer is a very useful tool. Many websites ask us to upload documents as images, but they also set a file size limit. Modern phone cameras can create images that are several megabytes in size, but an application website may only accept images below a certain size.
There are online tools such as reduceimages.com, but they can have limitations. Some have daily usage limits, some show too many ads, and some are not comfortable for private documents.
So, in this tutorial, we will build our own image size reducer web app in Python using:
- Streamlit for the web interface
- Pillow for reading uploaded images
- OpenCV for resizing and saving images
- NumPy for array handling
- a small config file for app settings
The Streamlit version used in the original blog was 1.12.0.
Below is the demo of the working app we are going to build.
What This App Will Do
The image size reducer app will allow users to:
- upload an image
- preview the uploaded image
- view the original image dimensions
- view the original file size
- choose a new height and width
- resize the image
- view the new file size
- download the resized image
This is a simple project, but it is a good beginner example because it combines image processing and web app development.
Why Build an Image Size Reducer?
This tool is useful in many real situations:
- reducing passport photos
- resizing scanned documents
- compressing application form images
- preparing images for websites
- reducing storage size
- preparing images before email upload
- resizing images for machine learning experiments
Instead of depending on an external website, we can create our own tool and control the features.
Project Structure
Since this project is still in the beginning, it is a good idea to keep the structure simple but clean.
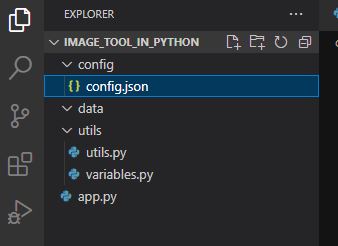
A possible project structure is:
image-processing-web-tool/
│
├── app.py
├── config/
│   └── config.json
│
├── utils/
│   ├── __init__.py
│   └── variables.py
│
├── data/
│
├── assets/
│
├── requirements.txt
└── README.md
Here:
app.pycontains the Streamlit appconfig/config.jsoncontains app configurationutils/variables.pyloads configuration valuesdata/stores temporary uploaded and resized filesassets/stores images and iconsrequirements.txtlists Python packages
Required Python Packages
We need the following packages:
streamlit
opencv-python-headless
numpy
pillow
Install them with:
pip install streamlit opencv-python-headless numpy pillow
For local development, opencv-python can also work. But for deployment on cloud platforms, opencv-python-headless is usually better because it does not require GUI libraries.
Config File
The config file stores application settings. This is useful because we can change app behavior without editing the main app code.
Create config/config.json:
{
    "version": "0.0.1",
    "logging": {
        "level": "DEBUG",
        "console_log": true
    },
    "allowed_modes": {
        "Image Size Reducer": {
            "extensions": "png,jpeg,jpg"
        }
    },
    "execution_mode": {
        "mode": "dev"
    }
}
In this config file, we define:
- app version
- logging settings
- allowed modes
- allowed image extensions
- execution mode
For now, only Image Size Reducer is available. Later, we can add more modes such as image merger, color changer, edge detector, or image converter.
variables.py File
The variables.py file reads the config file and makes the values available globally.
"""Module to define global variables."""

import inspect
import json
import os


class Variables:
    """Read config file and hold global variables."""

    curr_dir = os.path.dirname(
        os.path.abspath(inspect.getfile(inspect.currentframe()))
    )
    root_dir = os.path.dirname(curr_dir)
    conf_dir = os.path.join(root_dir, "config")

    config_file_path = os.path.join(conf_dir, "config.json")
    path = os.path.dirname(os.path.dirname(os.path.abspath(__file__)))

    with open(config_file_path, "r", encoding="utf-8") as file:
        config = json.load(file)

    logging = config["logging"]
    level = logging["level"]
    console_log = logging["console_log"]
    version = config["version"]

    allowed_modes_dict = config["allowed_modes"]
    allowed_modes = list(allowed_modes_dict.keys())

    def __getitem__(self, key):
        """Get a config value by key."""
        return self.config[key]


try:
    var = Variables()
except Exception as err:
    raise err
This file helps us avoid hardcoding values in app.py.
Create the Streamlit App
The main app file is app.py.
At first, we import the required modules.
import os
import time

import cv2
import numpy as np
import streamlit as st
from PIL import Image

from utils.variables import var
We use:
streamlitfor the UIcv2for resizing and saving imagesnumpyfor image arraysPIL.Imagefor reading uploaded image filesosandtimefor file handlingvarfor config values
Set Streamlit Page Layout
st.set_page_config(layout="wide")
The wide layout gives more horizontal space. This is useful when showing images.
Add Sidebar Mode Selection
sidebar = st.sidebar
sidebar.markdown("## Modes")

size_reducer = sidebar.checkbox("Image Size Reducer")
The sidebar lets users select which tool they want to use.
For now, we only have one mode.
Basic Image Upload
If the image size reducer mode is selected, we show the file uploader.
if size_reducer:
    st.markdown("## Selected Size Reducer")

    exts = var.allowed_modes_dict["Image Size Reducer"]["extensions"].split(",")

    uploaded_file = st.file_uploader(
        f"Select file: {exts}",
        type=exts
    )

    if uploaded_file is not None:
        img = Image.open(uploaded_file)
        img = np.array(img)

        st.image(img, use_column_width=True)
else:
    st.markdown("## No Mode Selected!!")
This first version only uploads and shows the image.
Store Temporary Image
Now we need to save the uploaded image temporarily. This lets us calculate the file size and later save the resized version.
fname = f"data/{int(time.time())}." + uploaded_file.name.split(".")[-1]

img = Image.open(uploaded_file).convert("RGB")

with open(fname, "wb") as file:
    file.write(uploaded_file.getbuffer())
Here:
- the file name uses the current timestamp
- the image is converted to RGB
- the uploaded file is saved inside the
data/folder
We use .convert("RGB") because uploaded images may have alpha channels or different modes. For this tool, RGB is enough.
Remove Old Temporary Files
Every time widgets update, Streamlit may rerun the script. This can create many temporary files. So, we should remove old files.
for file_name in os.listdir("data"):
    try:
        timestamp = float(file_name.split(".")[0])

        if time.time() - timestamp > 120:
            os.remove("data/" + file_name)

    except Exception:
        pass
This removes files older than 120 seconds.
A cleaner function can be:
def remove_old_files(folder="data", max_age_seconds=120):
    """Remove old temporary files from the data folder."""
    os.makedirs(folder, exist_ok=True)

    for file_name in os.listdir(folder):
        file_path = os.path.join(folder, file_name)

        if not os.path.isfile(file_path):
            continue

        try:
            timestamp = float(file_name.split(".")[0])

            if time.time() - timestamp > max_age_seconds:
                os.remove(file_path)

        except Exception:
            pass
Then call it like this:
remove_old_files()
Show Original Image Information
After reading the image, we can show its shape and file size.
img = np.asarray(img)

height, width, _ = img.shape

show_image = st.checkbox("Show Image")

if show_image:
    st.image(img, use_column_width=True)

st.markdown(
    f"""
    Original dimension of the image: `{height, width}`
    Original size of the image: `{os.path.getsize(fname) / 1024:.2f} KB`
    Please select height and width.
    """
)
In NumPy image arrays:
height, width, channels = img.shape
Height is related to the Y-axis, and width is related to the X-axis.
Add Height and Width Widgets
Now we create two number inputs for the new image size.
cols = st.columns(2)

h = cols[0].number_input(
    "Height",
    min_value=1,
    value=int(height)
)

w = cols[1].number_input(
    "Width",
    min_value=1,
    value=int(width)
)
The user can select the desired height and width.
Resize Image with OpenCV
Now we resize the image when the user clicks the button.
if st.button("Reduce size!!"):
    nimg = cv2.resize(
        img,
        (int(w), int(h)),
        interpolation=cv2.INTER_AREA
    )

    nfname = fname.replace("data/", "data/temp_")

    nimg = cv2.cvtColor(nimg, cv2.COLOR_RGB2BGR)

    cv2.imwrite(nfname, nimg)

    st.markdown(
        f"New file size: `{os.path.getsize(nfname) / 1024:.2f} KB`"
    )
There is one important point:
cv2.resize(img, (width, height))
OpenCV expects the size as (width, height), not (height, width).
So we pass:
(int(w), int(h))
Download Resized Image
Streamlit provides st.download_button() for downloads.
with open(nfname, "rb") as file:
    dbtn = st.download_button(
        label="Download image file",
        data=file,
        file_name=nfname.split("/")[-1],
        mime="image/png"
    )

    if dbtn:
        st.markdown("Downloaded!!!!")
This opens the resized image as bytes and sends it to the download button.
Full app.py Code
Here is the full version of app.py.
import os
import time

import cv2
import numpy as np
import streamlit as st
from PIL import Image

from utils.variables import var


def remove_old_files(folder="data", max_age_seconds=120):
    """Remove old temporary files from the data folder."""
    os.makedirs(folder, exist_ok=True)

    for file_name in os.listdir(folder):
        file_path = os.path.join(folder, file_name)

        if not os.path.isfile(file_path):
            continue

        try:
            timestamp = float(file_name.split(".")[0])

            if time.time() - timestamp > max_age_seconds:
                os.remove(file_path)

        except Exception:
            pass


st.set_page_config(layout="wide")

sidebar = st.sidebar
sidebar.markdown("## Modes")

size_reducer = sidebar.checkbox("Image Size Reducer")

remove_old_files()

if size_reducer:
    st.markdown("## Selected Size Reducer")

    exts = var.allowed_modes_dict["Image Size Reducer"]["extensions"].split(",")

    uploaded_file = st.file_uploader(
        f"Select file: {exts}",
        type=exts
    )

    if uploaded_file is not None:
        fname = f"data/{int(time.time())}." + uploaded_file.name.split(".")[-1]

        img = Image.open(uploaded_file).convert("RGB")

        with open(fname, "wb") as file:
            file.write(uploaded_file.getbuffer())

        img = np.asarray(img)

        height, width, _ = img.shape

        show_image = st.checkbox("Show Image")

        if show_image:
            st.image(img, use_column_width=True)

        st.markdown(
            f"""
            Original dimension of the image: `{height, width}`
            Original size of the image: `{os.path.getsize(fname) / 1024:.2f} KB`
            Please select height and width.
            """
        )

        cols = st.columns(2)

        h = cols[0].number_input(
            "Height",
            min_value=1,
            value=int(height)
        )

        w = cols[1].number_input(
            "Width",
            min_value=1,
            value=int(width)
        )

        if st.button("Reduce size!!"):
            nimg = cv2.resize(
                img,
                (int(w), int(h)),
                interpolation=cv2.INTER_AREA
            )

            nfname = fname.replace("data/", "data/temp_")

            nimg = cv2.cvtColor(nimg, cv2.COLOR_RGB2BGR)

            cv2.imwrite(nfname, nimg)

            st.markdown(
                f"New file size: `{os.path.getsize(nfname) / 1024:.2f} KB`"
            )

            with open(nfname, "rb") as file:
                dbtn = st.download_button(
                    label="Download image file",
                    data=file,
                    file_name=nfname.split("/")[-1],
                    mime="image/png"
                )

                if dbtn:
                    st.markdown("Downloaded!!!!")
else:
    st.markdown("## No Mode Selected!!")
Common Mistake in Resizing
A common mistake is mixing height and width in OpenCV.
This is wrong:
cv2.resize(img, (height, width))
This is correct:
cv2.resize(img, (width, height))
Because OpenCV expects:
(width, height)
while NumPy image shape gives:
(height, width, channels)
Improve Image Resizing Quality
For shrinking images, cv2.INTER_AREA is usually a good choice.
cv2.resize(img, (w, h), interpolation=cv2.INTER_AREA)
For enlarging images, you may try:
cv2.INTER_CUBIC
or:
cv2.INTER_LINEAR
Preserve Aspect Ratio
The current version lets the user choose both height and width manually. This gives flexibility, but it can distort the image if the aspect ratio changes.
A better version can keep the aspect ratio.
new_width = 800
scale = new_width / width
new_height = int(height * scale)

resized = cv2.resize(
    img,
    (new_width, new_height),
    interpolation=cv2.INTER_AREA
)
This resizes the image based on width while keeping the original ratio.
Add File Validation
It is good to check whether the uploaded file can be opened as an image.
try:
    img = Image.open(uploaded_file).convert("RGB")
except Exception as error:
    st.error(f"Could not open image: {error}")
    st.stop()
This avoids app crashes when the uploaded file is invalid.
Requirements File
A simple requirements.txt can be:
streamlit
opencv-python-headless
numpy
pillow
For the original version, Streamlit was pinned as:
streamlit==1.12.0
Pinning versions can make deployment more reproducible, but very old versions may cause compatibility issues later.
Source Code
Please follow this link for the full code:
Future Improvements
This is only the first version of the image tool. Later, we can add more features such as:
- image merger
- image format converter
- image compression quality slider
- aspect ratio lock
- image rotation
- image cropping
- color adjustment
- edge detection
- convolution filters
- batch image processing
- PDF export
Final Thoughts
In this blog, we built a simple image size reducer web app in Python using Streamlit, Pillow, OpenCV, and NumPy. The app can upload an image, show its size and dimensions, resize it, save the reduced version, and allow the user to download it.
This is a useful beginner project because it combines Python image processing and web app development. In the next part, we can extend this app by adding more image processing tools such as image merging, color changing, convolution, and edge detection.


Comments