
Deploy a Streamlit Image Manipulation Tool on Heroku from GitHub
In this post, we will deploy an image manipulation tool on Heroku. The app is built with Python and Streamlit, and it can perform simple image processing tasks such as image resizing and image merging.
Heroku is a cloud application platform that lets us deploy web apps from a GitHub repository. It is useful for quickly turning a local project into a live web app.
By the end of this tutorial, we will prepare the required deployment files and deploy a Streamlit image manipulation app using Heroku.
Note: The original demo app was deployed at image-manipulation-tool.herokuapp.com. This link may no longer be active because Heroku changed its free hosting policy after this post was first written.
Previous Parts
This post is part of a small image manipulation tool series.
Previous parts:
In the previous posts, we built the main tool. Now we will make the app live.
What We Are Deploying
The project is a Python web app that uses:
- Streamlit for the web interface
- Pillow for image handling
- OpenCV for image processing
- NumPy for array operations
- Heroku for deployment
- GitHub for source code hosting
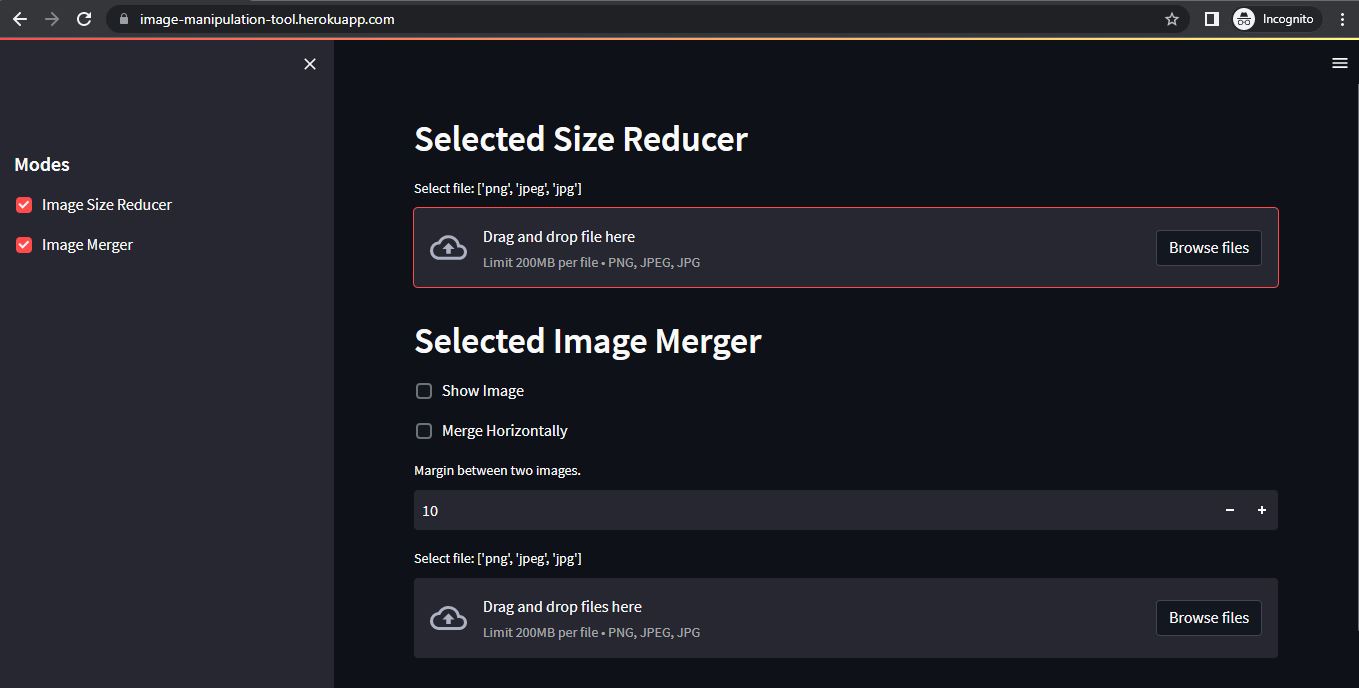
The final app should look like this:
Important Note About Heroku Pricing
When the original version of this post was written, Heroku had a free tier. Heroku later removed free dynos and free data plans. So, if you are following this tutorial today, you may need a paid Heroku plan or another deployment platform.
The deployment steps are still useful because they explain how Heroku apps work with requirements.txt, Procfile, and GitHub deployment.
Project Folder Structure
A simple Streamlit project for Heroku can look like this:
image-manipulation-tool/
│
├── app.py
├── requirements.txt
├── setup.sh
├── Procfile
├── README.md
└── data/
The important files for Heroku deployment are:
app.pyrequirements.txtsetup.shProcfile
Create a Heroku Account
First, create or log in to a Heroku account.
- Visit Heroku Login
- Create an account if you do not already have one
- Open the Heroku dashboard
Then create a new app:
- Go to the Heroku dashboard
- Click New
- Click Create new app
- Give your app a unique name
- Select your region
- Create the app
The app name becomes part of the app URL.
For example:
https://your-app-name.herokuapp.com
Prepare requirements.txt
The requirements.txt file tells Heroku which Python packages are needed.
For this image manipulation tool, we can use:
streamlit==1.12.0
numpy
pillow==6.2.0
opencv-python-headless
Here is why we use these packages:
streamlitruns the web appnumpyhandles image arrayspillowhandles image input and outputopencv-python-headlessprovides OpenCV without GUI dependencies
For deployment, opencv-python-headless is usually better than opencv-python because cloud servers do not need desktop GUI features.
Should You Pin Package Versions?
In the original app, some versions were pinned.
streamlit==1.12.0
pillow==6.2.0
Pinning versions makes deployment more reproducible. But very old package versions can also cause compatibility problems.
For a newer deployment, you may try:
streamlit
numpy
pillow
opencv-python-headless
If the app breaks after a package update, pin the working versions.
A practical approach is:
- test the app locally
- run
pip freeze > requirements.txt - remove unnecessary packages
- keep only the packages the app actually needs
Create setup.sh
Streamlit needs to run on the port provided by Heroku. Heroku provides the port through the $PORT environment variable.
Create a file named setup.sh.
mkdir -p ~/.streamlit
mkdir -p data

echo "[server]
headless = true
port = $PORT
enableCORS = false
" > ~/.streamlit/config.toml
This file does three things:
- creates the Streamlit config folder
- creates a
datafolder for temporary files - writes Streamlit server configuration
The most important line is:
port = $PORT
Heroku decides the port dynamically, so we should not hard-code a port like 8501.
Create Procfile
A Procfile tells Heroku how to run the app.
Create a file named Procfile with no file extension.
web: sh setup.sh && streamlit run app.py
This means:
- the process type is
web - Heroku should run
setup.sh - then it should start the Streamlit app with
streamlit run app.py
The web process type is important because Heroku uses it for web apps that receive HTTP traffic.
Check Your app.py
Your Streamlit app should have a main file named app.py.
A very simple example:
import streamlit as st
from PIL import Image

st.set_page_config(
    page_title="Image Manipulation Tool",
    page_icon="🖼️",
    layout="wide"
)

st.title("Image Manipulation Tool")

uploaded_file = st.file_uploader(
    "Upload an image",
    type=["png", "jpg", "jpeg"]
)

if uploaded_file is not None:
    image = Image.open(uploaded_file)

    st.image(image, caption="Uploaded image", use_column_width=True)

    st.write("Image size:", image.size)
Before deploying, test locally:
streamlit run app.py
If the app does not work locally, it will usually not work on Heroku either.
Push the Project to GitHub
Heroku can deploy from a GitHub repository.
First, initialize Git if you have not already done so.
git init
git add .
git commit -m "Prepare Streamlit app for Heroku deployment"
Then create a GitHub repository and push the code.
git remote add origin https://github.com/your-username/image-manipulation-tool.git
git branch -M main
git push -u origin main
Make sure these files are present in the repository:
app.py
requirements.txt
setup.sh
Procfile
Connect Heroku with GitHub
Now go back to the Heroku dashboard.
Open your app and go to the Deploy tab.
Under Deployment method, choose GitHub.
Then:
- connect your GitHub account
- search for your repository
- select the repository
- choose the branch, usually
main
Heroku can deploy manually or automatically from GitHub.
Manual Deploy
Manual deploy is useful when you want to control when the app is deployed.
In the Heroku dashboard:
- go to the Deploy tab
- scroll to Manual deploy
- select the branch
- click Deploy Branch
Heroku will build the app and install dependencies from requirements.txt.
Automatic Deploy
Automatic deploy is useful when you want Heroku to deploy every time you push to GitHub.
In the Heroku dashboard:
- go to the Deploy tab
- enable automatic deploys
- select the branch
- push changes to GitHub
After this, every push to the selected branch can trigger a new deployment.
Deploying with Heroku CLI
Another way to deploy is with the Heroku CLI.
Install and log in:
heroku login
Add the Heroku remote:
heroku git:remote -a your-app-name
Deploy:
git push heroku main
This is useful if you prefer command-line deployment.
Open the App
After deployment finishes, click Open app in the Heroku dashboard.
You can also open it from the CLI:
heroku open
The app should show your Streamlit interface.
Common Deployment Problems
Here are some common problems and fixes.
Problem 1: App Crashes After Deployment
Check the logs:
heroku logs --tail
Common causes:
- missing package in
requirements.txt - wrong file name
- app file is not named
app.py - wrong command in
Procfile - package version conflict
Problem 2: Streamlit Does Not Use Heroku Port
Make sure setup.sh contains:
port = $PORT
Also make sure Procfile runs setup.sh.
web: sh setup.sh && streamlit run app.py
Problem 3: OpenCV Installation Fails
Use:
opencv-python-headless
instead of:
opencv-python
The headless version is better for cloud deployment.
Problem 4: Uploaded Files Disappear
Heroku’s file system is temporary. Files written during runtime may disappear after dyno restart.
For permanent storage, use an external storage service such as:
- AWS S3
- Google Cloud Storage
- Cloudinary
- database storage for metadata
For this simple image tool, temporary files may be enough.
Problem 5: App Is Sleeping or Not Available
Depending on the Heroku plan, the app may sleep or require a paid dyno. Check your Heroku plan and dashboard.
Improve the Streamlit App for Deployment
Before making the app public, it is good to improve a few things.
Add File Size Limit
Large image uploads can slow down the app.
uploaded_file = st.file_uploader(
    "Upload an image",
    type=["png", "jpg", "jpeg"]
)
You can also check the file size before processing.
Add Error Handling
try:
    image = Image.open(uploaded_file)
except Exception as error:
    st.error(f"Could not open image: {error}")
Add Clear Buttons
If the app stores temporary images, add a button to clear them.
if st.button("Clear"):
    st.experimental_rerun()
Add a README
A good README.md should include:
- what the app does
- screenshots
- installation steps
- local run command
- deployment steps
- known limitations
Alternative Deployment Options
Heroku is one option, but it is not the only one.
Other options for Streamlit apps include:
- Streamlit Community Cloud
- Render
- Railway
- Hugging Face Spaces
- Google Cloud Run
- AWS App Runner
- Docker-based VPS deployment
If you only want to deploy a simple Streamlit demo, Streamlit Community Cloud may be easier. If you want more control, Docker with a VPS or Cloud Run can be better.
Final Thoughts
In this post, we deployed a Streamlit image manipulation tool on Heroku. We prepared the main deployment files: requirements.txt, setup.sh, and Procfile. Then we connected the project to GitHub and deployed it from the Heroku dashboard.
The most important deployment files are:
requirements.txt
setup.sh
Procfile
app.py
Heroku is useful because it gives a structured way to deploy apps from GitHub. But because Heroku no longer provides the same free hosting experience it had when this post was first written, you may also want to compare other deployment platforms depending on your budget and project needs.


Comments