
Deploy a Streamlit App on a Custom Domain with Apache2, Ubuntu, systemd, and HTTPS
In this tutorial, we will deploy a Streamlit app on a custom domain using Apache2.
Streamlit is great for building data apps quickly. But after building an app, we often want to host it on our own domain, such as:
https://data.example.com
To do this, we can run Streamlit on an internal port and use Apache2 as a reverse proxy. Apache receives requests from the browser and forwards them to the Streamlit app.
In this guide, we will use:
- Ubuntu server
- a domain or subdomain
- DNS A record
- Apache2
- UFW firewall
- Python virtual environment
- Streamlit
- systemd service
- Certbot and Let’s Encrypt for HTTPS
The original version of this post used a Contabo VPS and Apache2. The same idea also works with other VPS providers such as Hetzner, DigitalOcean, AWS EC2, Oracle Cloud, Linode, or any Ubuntu server.
What We Will Build
The final setup will look like this:
User Browser
     |
     | https://data.example.com
     v
Apache2 on ports 80/443
     |
     | reverse proxy
     v
Streamlit app on localhost:8502
The user visits:
https://data.example.com
But internally, Streamlit runs on:
http://127.0.0.1:8502
This is cleaner than exposing the Streamlit port directly.
Requirements
Before starting, you need:
- a VPS or cloud server running Ubuntu
- a domain name
- SSH access to the server
- basic Linux command-line knowledge
- a Streamlit app, for example
app.py
In this tutorial, I will use:
data.example.com
as the example subdomain. Replace it with your own domain.
Step 1: Have a Domain Name
First, you need a domain name. In the original version, I used a domain from GoDaddy.
You can buy a domain from providers such as:
- GoDaddy
- Namecheap
- Cloudflare Registrar
- Porkbun
- Google Domains alternatives
- any local domain registrar
After buying a domain, you need to point it to your server.

Step 2: Understand DNS Records
DNS records tell the internet where your domain should point.
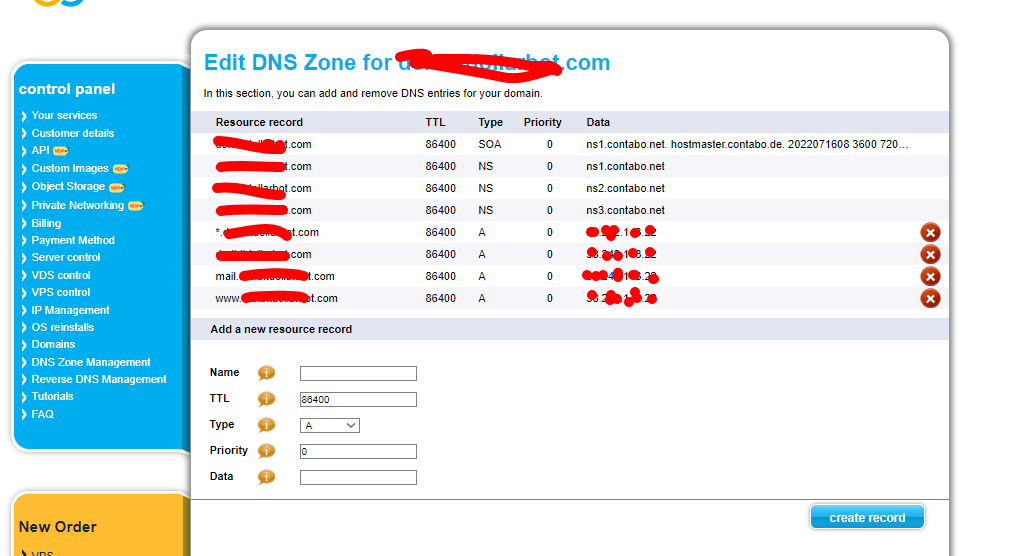
The most important record for this tutorial is the A record.
An A record maps a domain or subdomain to an IPv4 address.
Example:
Type: A
Name: data
Value: your_server_public_ip
TTL: Auto
This means:
data.example.com -> your_server_public_ip
If you want all subdomains to point to the same server, you can use a wildcard record:
Type: A
Name: *
Value: your_server_public_ip
But for a simple setup, it is better to create only the subdomain you need.
Step 3: Check DNS Propagation
After adding DNS records, it can take some time to update.
You can check from your local machine:
ping data.example.com
or:
dig data.example.com
If DNS is correct, it should show your server IP.
Step 4: Install Ubuntu on the Server
This tutorial uses Ubuntu because it is simple and widely supported.
Most VPS providers let you choose Ubuntu during server creation. Ubuntu 22.04 LTS or Ubuntu 24.04 LTS are good choices.
After creating the server, SSH into it:
ssh root@your_server_ip
or if you have a user:
ssh ubuntu@your_server_ip
Step 5: Update the Server
Run:
sudo apt update
sudo apt upgrade -y
Install useful packages:
sudo apt install -y python3 python3-pip python3-venv git curl ufw
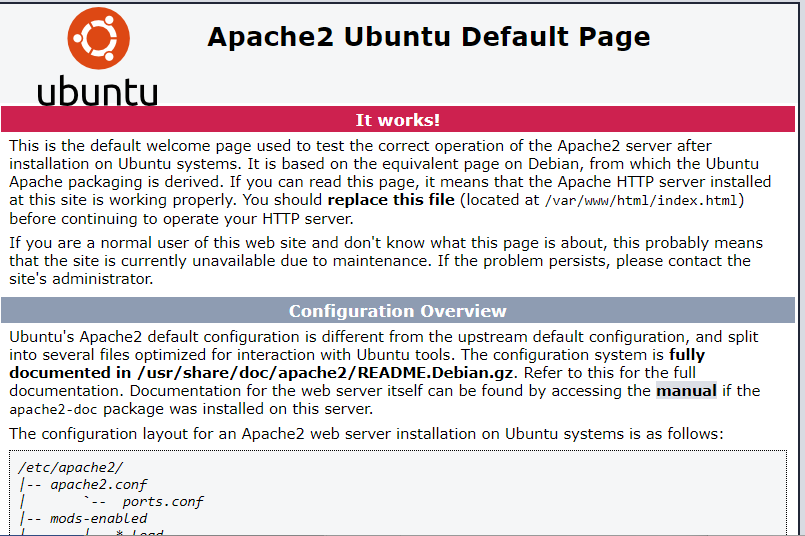
Step 6: Install Apache2
Apache2 is a web server. We will use it as a reverse proxy.
Install Apache2:
sudo apt install -y apache2
Start and enable it:
sudo systemctl start apache2
sudo systemctl enable apache2
Check status:
sudo systemctl status apache2
If Apache is running, visit your server IP in the browser:
http://your_server_ip
You should see the Apache2 default page.
Step 7: Configure Firewall with UFW
If UFW is not installed:
sudo apt install -y ufw
Allow SSH first, otherwise you may lock yourself out.
sudo ufw allow OpenSSH
Allow Apache traffic:
sudo ufw allow "Apache Full"
Enable firewall:
sudo ufw enable
Check status:
sudo ufw status
You should see SSH and Apache allowed.
For this reverse-proxy setup, you do not need to expose Streamlit port 8502 publicly. Apache will access it locally.
Step 8: Check Apache Sites
Apache site configs are stored in:
/etc/apache2/sites-available/
Enabled sites are linked in:
/etc/apache2/sites-enabled/
Check current Apache virtual hosts:
sudo apache2ctl -S
In the original setup, the default page came from:
/var/www/html/index.html
You can enable or disable sites with:
sudo a2ensite site-name.conf
sudo a2dissite site-name.conf
After changes, reload Apache:
sudo systemctl reload apache2
Step 9: Create the Streamlit Project
Create a project folder.
sudo mkdir -p /opt/streamlit-apps/data-app
sudo chown -R $USER:$USER /opt/streamlit-apps/data-app
cd /opt/streamlit-apps/data-app
Create a virtual environment.
python3 -m venv env
source env/bin/activate
Install Streamlit and dependencies.
pip install --upgrade pip
pip install streamlit pandas plotly
If your app needs more packages, install them too.
For example:
pip install numpy matplotlib scikit-learn
Step 10: Create a Simple Streamlit App
Create app.py.
nano app.py
Add this simple app:
import streamlit as st
import pandas as pd


st.set_page_config(
    page_title="Data App",
    page_icon="📊",
    layout="wide"
)

st.title("Streamlit App on Custom Domain")

st.write("This Streamlit app is running behind Apache2 reverse proxy.")

df = pd.DataFrame({
    "x": [1, 2, 3, 4, 5],
    "y": [10, 20, 15, 30, 25]
})

st.line_chart(df.set_index("x"))
Test it manually:
streamlit run app.py --server.address 127.0.0.1 --server.port 8502 --server.headless true
From the server, check:
curl http://127.0.0.1:8502
If it returns HTML, Streamlit is running.
Stop it with CTRL + C.
Step 11: Create Streamlit config.toml
You can configure Streamlit with a .streamlit/config.toml file.
Create the folder:
mkdir -p .streamlit
nano .streamlit/config.toml
Add:
[server]
headless = true
address = "127.0.0.1"
port = 8502
enableCORS = false
enableXsrfProtection = false

[browser]
serverAddress = "data.example.com"
serverPort = 443
This tells Streamlit to run locally on port 8502.
The app will not be directly exposed to the internet. Apache will expose it through the domain.
Step 12: Run Streamlit as a systemd Service
Running Streamlit manually in a terminal is not reliable. If the SSH session closes, the app may stop.
A better way is to run it as a systemd service.
Create a service file:
sudo nano /etc/systemd/system/streamlit-data-app.service
Add:
[Unit]
Description=Streamlit Data App
After=network.target

[Service]
User=ubuntu
Group=ubuntu
WorkingDirectory=/opt/streamlit-apps/data-app
Environment="PATH=/opt/streamlit-apps/data-app/env/bin"
ExecStart=/opt/streamlit-apps/data-app/env/bin/streamlit run app.py --server.address 127.0.0.1 --server.port 8502 --server.headless true
Restart=always
RestartSec=5

[Install]
WantedBy=multi-user.target
Replace ubuntu with your Linux username.
Reload systemd:
sudo systemctl daemon-reload
Start the service:
sudo systemctl start streamlit-data-app
Enable it on boot:
sudo systemctl enable streamlit-data-app
Check status:
sudo systemctl status streamlit-data-app
View logs:
journalctl -u streamlit-data-app -f
Step 13: Enable Apache Proxy Modules
Apache needs proxy modules for reverse proxying.
Enable the required modules:
sudo a2enmod proxy
sudo a2enmod proxy_http
sudo a2enmod proxy_wstunnel
sudo a2enmod rewrite
sudo a2enmod headers
Restart Apache:
sudo systemctl restart apache2
Streamlit uses WebSocket connections, so WebSocket proxy support is important.
Step 14: Configure Apache VirtualHost
Create a new Apache config file:
sudo nano /etc/apache2/sites-available/data.example.com.conf
Add this configuration:
<VirtualHost *:80>
    ServerName data.example.com
    ServerAdmin admin@example.com

    ProxyPreserveHost On
    ProxyRequests Off

    RewriteEngine On
    RewriteCond %{HTTP:Upgrade} =websocket [NC]
    RewriteRule /(.*) ws://127.0.0.1:8502/$1 [P,L]

    ProxyPass / http://127.0.0.1:8502/
    ProxyPassReverse / http://127.0.0.1:8502/

    ErrorLog ${APACHE_LOG_DIR}/data.example.com-error.log
    CustomLog ${APACHE_LOG_DIR}/data.example.com-access.log combined
</VirtualHost>
Replace:
data.example.com
admin@example.com
with your own domain and email.
Enable the site:
sudo a2ensite data.example.com.conf
Check syntax:
sudo apachectl configtest
If it says Syntax OK, reload Apache:
sudo systemctl reload apache2
Now visit:
http://data.example.com
Your Streamlit app should load.
Step 15: Add HTTPS with Certbot
HTTP works, but production apps should use HTTPS.
Install Certbot:
sudo apt install -y certbot python3-certbot-apache
Run Certbot:
sudo certbot --apache -d data.example.com
Follow the prompts.
Certbot can automatically create the HTTPS virtual host and set up certificate renewal.
Test renewal:
sudo certbot renew --dry-run
After this, your app should be available at:
https://data.example.com
Step 16: Apache HTTPS Config Example
After Certbot, Apache may create or modify SSL config. A typical HTTPS reverse proxy config looks like this:
<IfModule mod_ssl.c>
<VirtualHost *:443>
    ServerName data.example.com
    ServerAdmin admin@example.com

    ProxyPreserveHost On
    ProxyRequests Off

    RewriteEngine On
    RewriteCond %{HTTP:Upgrade} =websocket [NC]
    RewriteRule /(.*) ws://127.0.0.1:8502/$1 [P,L]

    ProxyPass / http://127.0.0.1:8502/
    ProxyPassReverse / http://127.0.0.1:8502/

    ErrorLog ${APACHE_LOG_DIR}/data.example.com-ssl-error.log
    CustomLog ${APACHE_LOG_DIR}/data.example.com-ssl-access.log combined

    SSLCertificateFile /etc/letsencrypt/live/data.example.com/fullchain.pem
    SSLCertificateKeyFile /etc/letsencrypt/live/data.example.com/privkey.pem
    Include /etc/letsencrypt/options-ssl-apache.conf
</VirtualHost>
</IfModule>
Usually, you do not need to write this manually if Certbot handles Apache configuration for you.
Step 17: Do You Need to Edit ports.conf?
In the original version, I added Streamlit’s port to Apache ports.conf.
For this reverse-proxy setup, you usually do not need to add:
Listen 8502
Apache should listen on:
Listen 80
Listen 443
Streamlit listens on 127.0.0.1:8502.
Apache proxies traffic to that local port.
This is cleaner and safer than exposing Streamlit’s internal port publicly.
Step 18: Using a Subdomain
In the original version, I used a subdomain like:
data.mydomain.com
The Apache config looked similar to this:
<VirtualHost *:80>
    ServerAdmin admin@mydomain.com
    ServerName data.mydomain.com
    ServerAlias data.mydomain.com

    ProxyRequests Off
    ProxyPreserveHost On

    ProxyPass / http://127.0.0.1:8502/
    ProxyPassReverse / http://127.0.0.1:8502/
</VirtualHost>
This idea still works. The key difference is that using 127.0.0.1 is better than using the public domain inside the proxy target.
Good:
ProxyPass / http://127.0.0.1:8502/
Avoid:
ProxyPass / http://mydomain.com:8502/
Using localhost keeps the internal app private.
Step 19: Multiple Streamlit Apps on One Server
You can host multiple Streamlit apps on one server by giving each app a different internal port.
Example:
data.example.com     -> 127.0.0.1:8502
ml.example.com       -> 127.0.0.1:8503
dashboard.example.com -> 127.0.0.1:8504
Each app should have:
- separate project folder
- separate virtual environment
- separate systemd service
- separate Apache virtual host
- separate subdomain DNS record
Example systemd services:
streamlit-data-app.service
streamlit-ml-app.service
streamlit-dashboard-app.service
Step 20: Deploy Updates
When you update the app code:
cd /opt/streamlit-apps/data-app
git pull
source env/bin/activate
pip install -r requirements.txt
sudo systemctl restart streamlit-data-app
Check logs:
journalctl -u streamlit-data-app -f
Troubleshooting
Problem 1: Apache Default Page Still Shows
Check whether your site is enabled.
sudo apache2ctl -S
Enable your site:
sudo a2ensite data.example.com.conf
sudo systemctl reload apache2
You can disable the default site if needed:
sudo a2dissite 000-default.conf
sudo systemctl reload apache2
Problem 2: Streamlit App Does Not Load
Check if Streamlit is running:
sudo systemctl status streamlit-data-app
Check local response:
curl http://127.0.0.1:8502
Check logs:
journalctl -u streamlit-data-app -f
Problem 3: 502 Proxy Error
A 502 error usually means Apache cannot reach Streamlit.
Check:
- Streamlit service is running
- Streamlit is on the correct port
- Apache config points to the correct port
- firewall is not blocking local traffic
- systemd service has correct working directory
Problem 4: WebSocket Error or App Keeps Reconnecting
Streamlit needs WebSocket support.
Make sure these modules are enabled:
sudo a2enmod proxy
sudo a2enmod proxy_http
sudo a2enmod proxy_wstunnel
sudo a2enmod rewrite
sudo systemctl restart apache2
Also make sure your VirtualHost includes WebSocket rewrite rules.
Problem 5: HTTPS Certificate Fails
Check DNS first:
dig data.example.com
Make sure port 80 is open:
sudo ufw status
Then retry Certbot:
sudo certbot --apache -d data.example.com
Problem 6: Permission Error in systemd
Make sure the service User owns the project folder.
sudo chown -R ubuntu:ubuntu /opt/streamlit-apps/data-app
Replace ubuntu with your actual username.
Security Tips
Here are some useful security tips:
- do not expose Streamlit port publicly
- bind Streamlit to
127.0.0.1 - use HTTPS
- keep Ubuntu updated
- use UFW firewall
- do not run the app as root
- store secrets in environment variables
- restrict database access
- check Apache and systemd logs
- keep Python dependencies updated
Final Checklist
Before calling the deployment complete, check:
- DNS A record points to the server
- Apache default page works
- Streamlit works locally on
127.0.0.1:8502 - systemd service starts on boot
- Apache virtual host is enabled
- Apache proxy modules are enabled
- HTTP domain loads the Streamlit app
- HTTPS certificate is installed
- WebSocket connection works
- Streamlit port is not publicly exposed
Final Thoughts
In this blog, we deployed a Streamlit app with a custom domain using Apache2. We configured DNS, installed Apache, created a Streamlit app, ran it with systemd, configured Apache as a reverse proxy, and added HTTPS with Certbot.
The most important idea is that Apache should be the public-facing server, while Streamlit should run privately on localhost. This gives a cleaner and safer deployment setup.
This approach works well for personal projects, dashboards, demos, and small internal tools. For larger production systems, you may also consider Docker, Nginx, cloud services, or a dedicated deployment platform.


Comments