Running Airflow in Windows with WSL
Getting Started With Airflow in WSL
This blog will be updated more on dataqoil.com.
Blog Versions
This blog will be updated frequently.
- 2021-12-01
- Written blog.
- 2021-12-05
- Updated contents upto TaskFlowAPI.
- 2021-12-07
- Updated contents upto SubDAGs.
- 2021-12-13
- Updated contents upto
TaskGroup.
- Updated contents upto
- 2022-01-09
Introduction
Airflow is a data pipelining tool used for ETL operations. It is a hot requirement in the field of data related jobs. Airflow schedules task on the concept of graph thus, there will be a collection of related task called as a DAG (Directed Acyclic Graph).
Installing WSL
Using airflow in Windows machine is hard way to go but with the use of Docker one can do it easily. But I am using Ubuntu in WSL (Windows Subsystem for Linux) to use Airflow in my Windows.
Installing Airflow
(Referenced from here.)
- Open the Ubuntu.
- Update system packages.
sudo apt update sudo apt upgrade - Installing PIP.
sudo apt-get install software-properties-common sudo apt-add-repository universe sudo apt-get update sudo apt-get install python-setuptools sudo apt install python3-pip - Run
sudo nano /etc/wsl.confthen, insert the block below, save and exit withctrl+sctrl+x[automount] root = / options = "metadata" -
To setup a airflow home, first make sure where to install it. Run
nano ~/.bashrc, insert the line below, save and exit withctrl+sctrl+xexport AIRFLOW_HOME=c/users/YOURNAME/airflowhomeMine is,
/mnt/c/users/dell/myName/documents/airflow - Install virtualenv to create environment.
sudo apt install python3-virtualenv - Create and activate environment.
virtualenv airflow_env source airflow_env/bin/activate - Install airflow
pip install apache-airflow - Make sure if Airflow is installed properly.
airflow infoIf no error pops up, proceed else install missing packages.
- Initialize DB. By default, sqlite is used.
airflow db init -
If a error comes saying “Operation is not Permitted” make sure you have write access to the $AIRFLOW_HOME folder from WSL. So do something like below:
sudo chmod -R 777 /mnt/c/Users/Dell/Documents/airflow/ - Create airflow user.
airflow users create [-h] -e EMAIL -f FIRSTNAME -l LASTNAME [-p PASSWORD] -r ROLE [--use-random-password] -u USERNAME - Start webserver.
airflow webserver-
Go to URL
http://localhost:8080/. If error pops up, check what is missing. Below page will be seen.
-
Next page might be something like below.
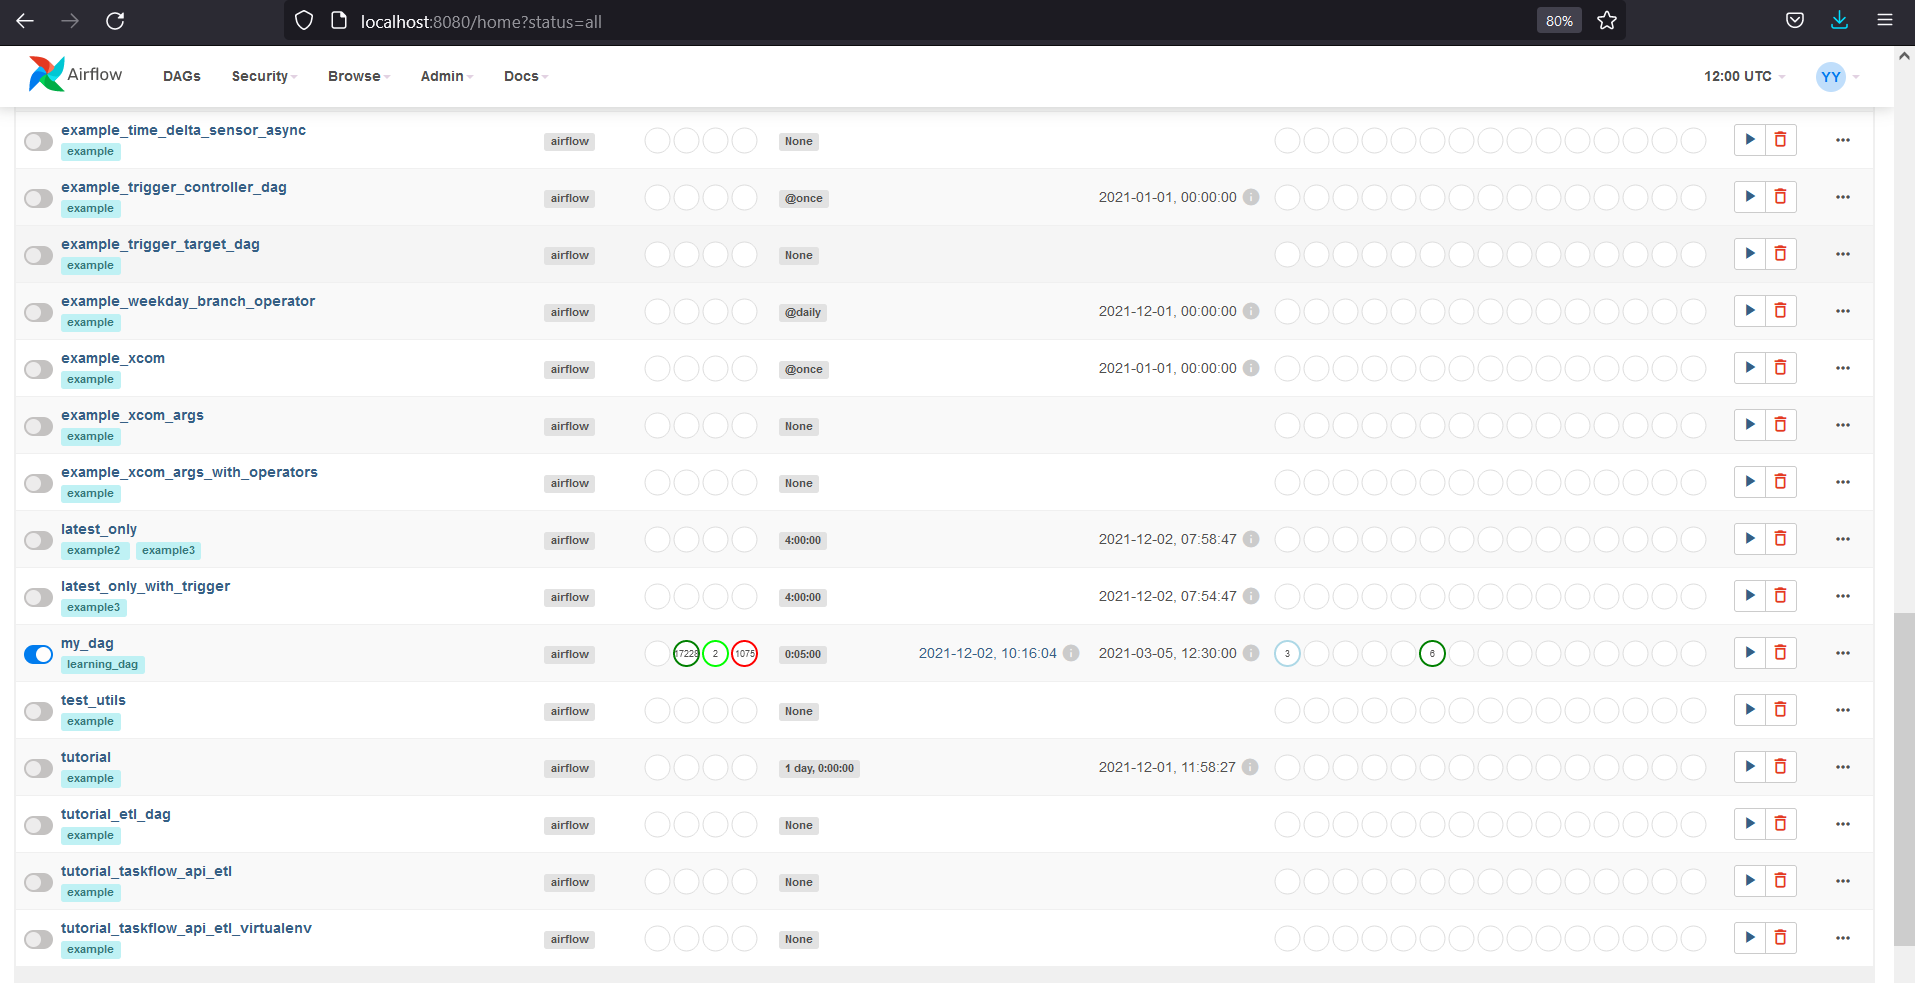
-
- In another terminal, enable virtual environment and then start scheduler.
airflow scheduler - If an error about not finding a job table is shown, find a section in
airflow.cfgfile where[webserver]is written and make sure somethin like below is present:[webserver] rbac = TrueWays to Define a DAG
Way 1
with DAG(..) as dag:
    DummyOperator()
Way 2
dag = DAG(..)
DummyOperator(dag=dag)
Our Dag
from airflow import DAG
from datetime import datetime, timedelta
from airflow.operators.python import PythonOperator
from airflow.models import Variable


with DAG(dag_id="my_dag", description="DAG for showing nothinig.",
        start_date=datetime(2021, 1, 1), schedule_interval=timedelta(minutes=5),
        dagrun_timeout=timedelta(minutes=10), tags=["learning_dag"], catchup=False) as dag:
First way is best way to do it because we do not have to give dag name to tasks everytime we define it.
Most Useful Parameters While Defininig a DAG
dag_id: should be unique else scheduler will randomly choose one dag with that id.start_date: should be used else error is shown but it is not default. It is a date at which task starts being scheduled. All DAG operators will use start_date of DAGschedule_interval: At which interval do we need to run. Possible values@daily,@weekly, cron job expression (ex. */10 * * * * for every 10min), timedelta, Interval of time from min(start_date) at which DAG is triggered. It waits for start_date + schedule_interval and then triggers, execution date is start_date.dagrun_timeout: What to do when dag is running for longer time? By default, it keeps running even if the previous dag is not complete. But we could stop DAG run after specified time.tags: To filter dags in UI. My DAG’s tag will belearning_dagcatchup: Should we run all the schedules that we missed? If True, scheduler will automatically trigger all the previous task runs that are available between this date and start date.
Cron Expression vs timedelta in schedule_interval
- Cron Expression: Stateless. Trigger according to the expression. 0 0 * * * is for each day’s 00:00:00 AM.
- timedelta: Stateful. Trigger according to previous execution date.
Task’s Rule
All task should be:
- Idempotence: If excuted multiple times, it should always have same side effect. If tried to create SQL table twice, error comes so to make idempothence, create if not exists”.
- Determinism: If task run with same input, output should always be same. If
Backfilling:
How to run on the previous date i.e past dates?
- Airflow will try to trigger all the non triggered tasks in the dates between current date and start date.
- Altered by
catchupparameter. If set toFalse, no previous task runs are triggered. But we can forcefully backfill from airflow CLI using commandairflow dags backfill -s 2021-10-01 -e 202011-01.
Running Limited DAGs at a Time
Using parameter max_active_runs, we could only run number of tasks that we intend to. We could limit resources usage by doing this and also we could manage dependencies between tasks.
Variables In Airflow
Object with key and a value stored in metadatabse. We can create via:
- Airflow UI: In Admin -> Variables.
- CLI
- APIs
Get variable via, Variable.get(). To make it secret, add _secret on the last of variable name.
Properly Fetch Variable
- Never use
Variable.get()outside a Task. Else we would be making a useless connection everytime our DAG is parsed. We will be making tons of useless variables. - How to retreive multiple relative variables? Instead of making connection request for each of variables, use JSON as value in Variable and pass deserialize_json=True to access json as dictionary.
- Passing variable only once. Instead of passing
Variable.get()inop_args, we could pass ` “{{ var.json.variable_name.variable_key}}” `. Doing this, we wont be making fetch more than once.
Examples
-
Create 3 variables from UI.
data_folder,test_dfanduser_infothen pass values accordingly. Make sureuser_infois in JSON format i.e.'{"uname":"admin","password":"password"}'. - Create a function outside DAG,
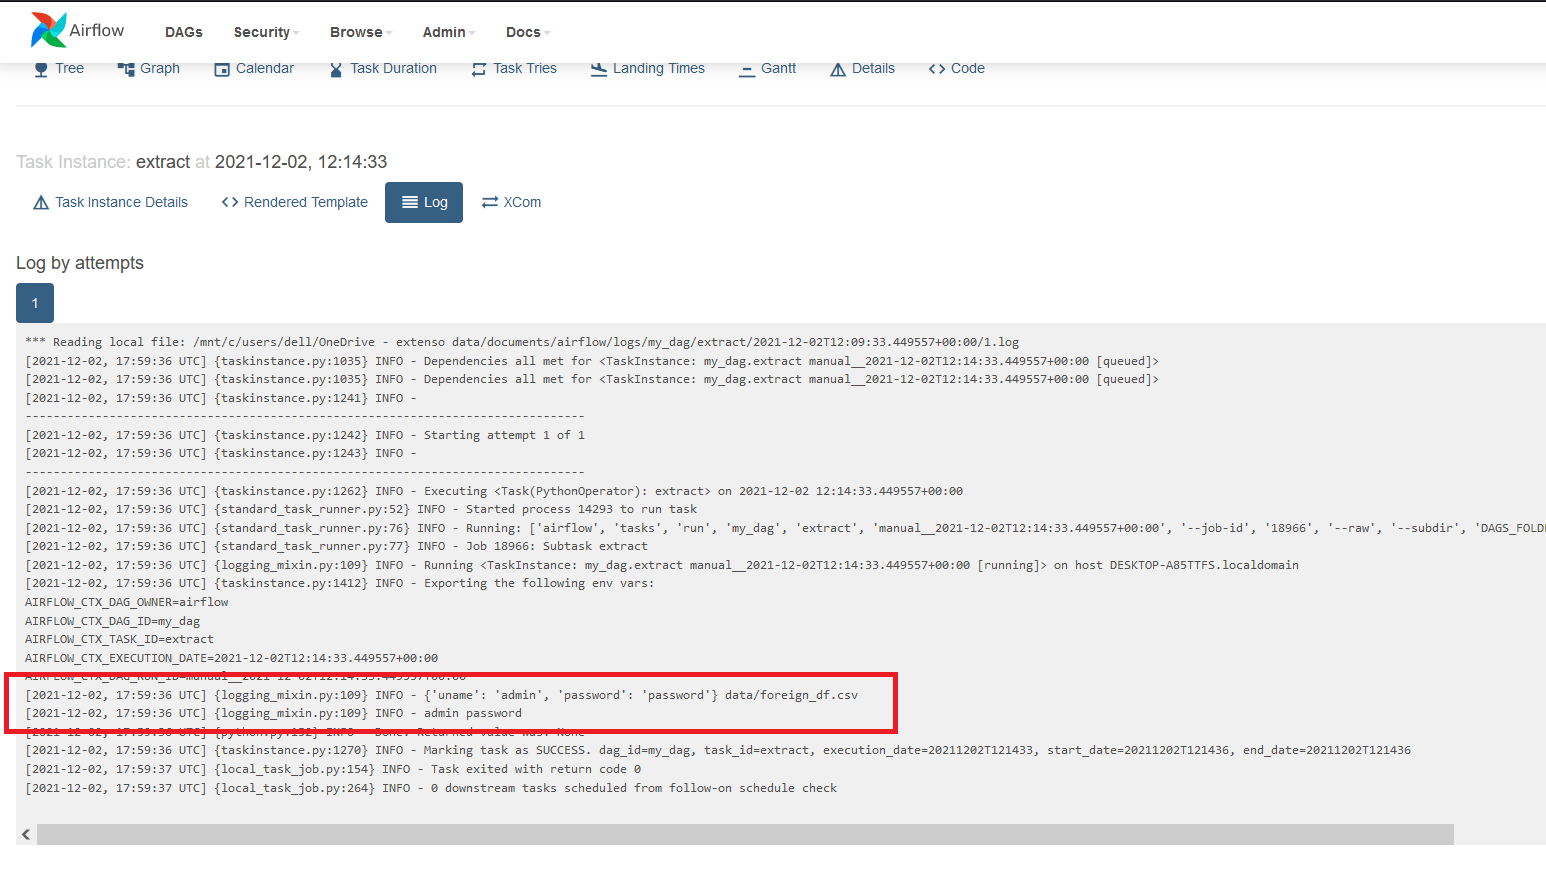
def _extract(): file_path = Variable.get("data_folder") + "/" + Variable.get("test_df") uinfo = Variable.get("user_info", deserialize_json=True) print(uinfo, file_path) print(uinfo["uname"], uinfo["password"]) - Inside a DAG create a task,
      extract = PythonOperator(
              task_id="extract",
              python_callable=_extract
              )
To see this task in action,
- Re-run scheduler and see the DAG with name
my_dagthen enable it. - Go inside the DAG and hit the trigger by clicking on play icon.
-
To see the output, go to the log by clicking on the green rectangle. And then logs.
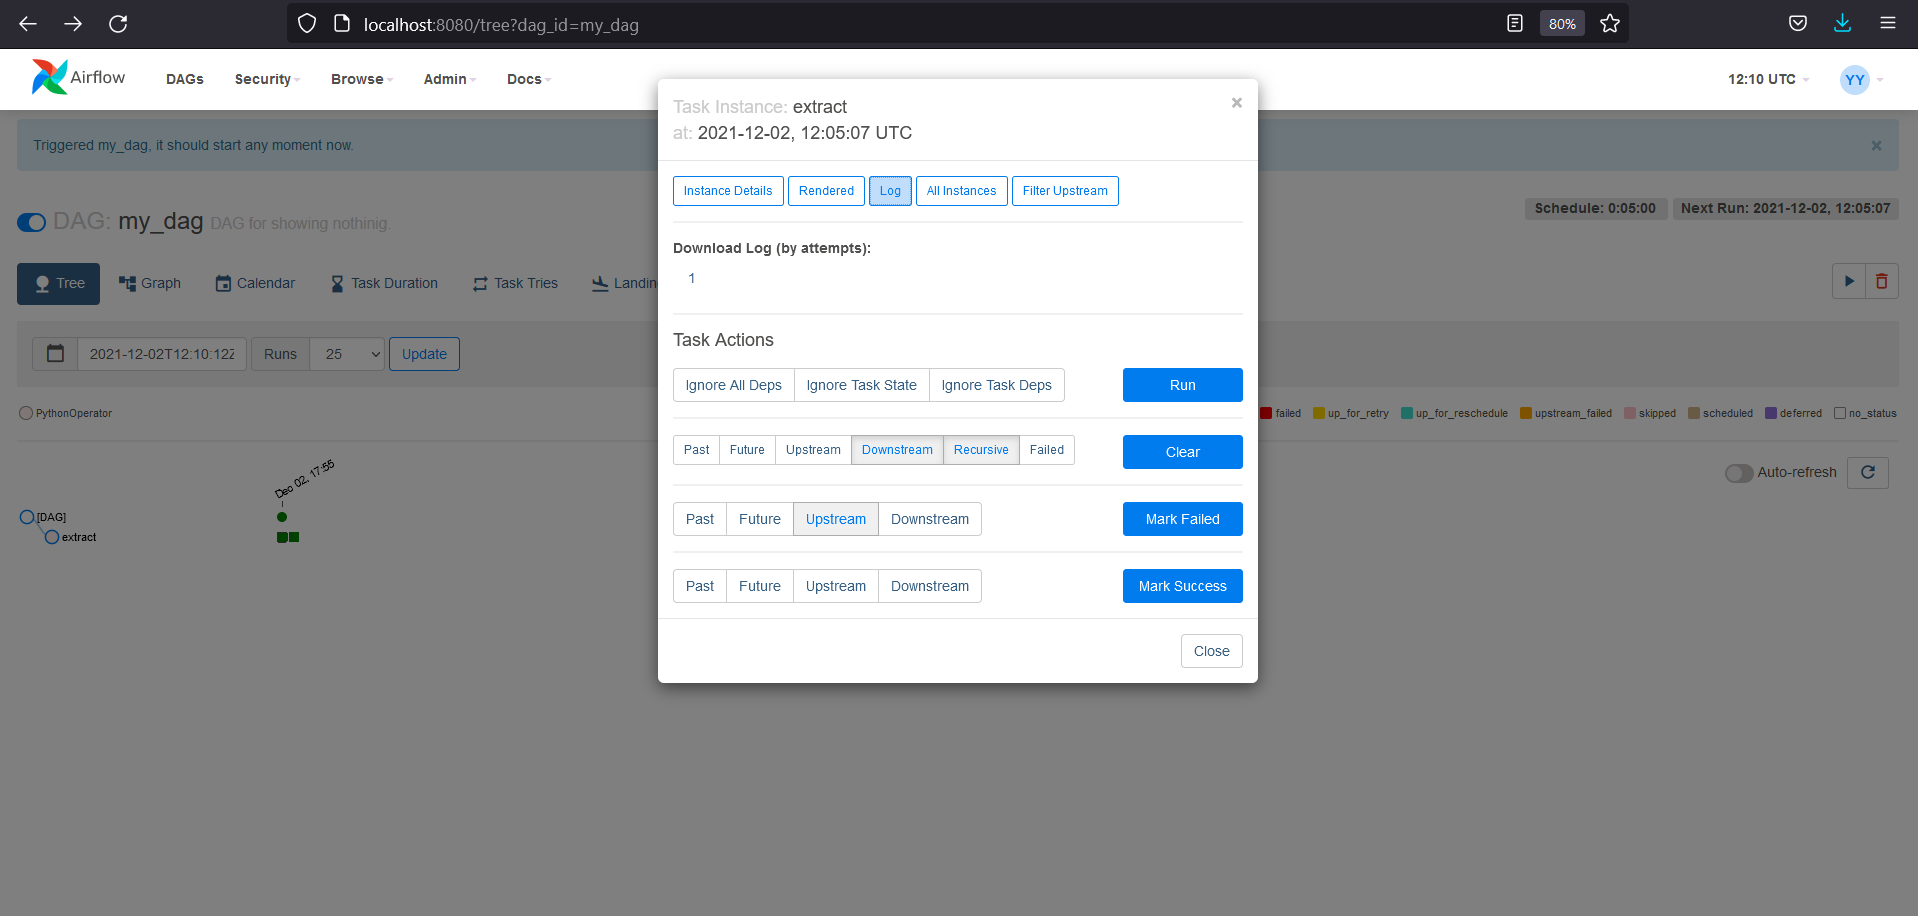
Logs output will be something like below
- Using
"{{var.json.variable_name.variable_key}}". Alternatively, we could do"{{var.value.variable_name}}". Outside DAG.
    def _extract2(uname):
        print(f"Username: {uname}")
- Inside DAG.
        extract2 = PythonOperator(
                task_id="extract2",
                python_callable=_extract2,
                op_args = ["{{ var.json.user_info.uname}}"])
Environment Variable
Why do we need environment variable? Well, first reason is that we will be hiding our variables from unwanted users and second reason is that we won’t have to make database connection everytime we want to access this variable.
Any airflow environment variable will start with AIRFLOW_VAR_ and will be in JSON format. ex
AIRFLOW_VAR_VARNAME='{"uname":"admin","password":"password"}'. To setup this variable, we have to create an environment variable first. To do so, export AIRFLOW_VAR_USER_INFO2='{"uname":"admin","password":"password"}'. The variable will not be permanent though so we need to insert it into .bashrc by nano ~/.bashrc.
Insert line export AIRFLOW_VAR_USER_INFO2='{"uname":"admin","password":"password"}' in bashrc file.
Examples
- Outside DAG.
    def _extract_env():
        print(Variable.get("user_info2", deserialize_json=True))
- Inside DAG.
        extract_env = PythonOperator(
                    task_id="extract_env",
                    python_callable=_extract_env
                    )
Codes Upto This Point
    from airflow import DAG
    from datetime import datetime, timedelta
    from airflow.operators.python import PythonOperator
    from airflow.models import Variable


    def _extract():
        """[summary]
        """
        file_path = Variable.get("data_folder") + "/" + Variable.get("test_df")
        uinfo = Variable.get("user_info", deserialize_json=True)
        # print(uinfo, file_path)
        print(uinfo["uname"], uinfo["password"])

    def _extract2(uname):
        """[summary]
        """
        print(f"Username: {uname}")

    def _extract_env():
        """[summary]
        """
        print(Variable.get("user_info2", deserialize_json=True))

    with DAG(dag_id="my_dag", description="DAG for showing nothinig.",
             start_date=datetime(2021, 1, 1), schedule_interval=timedelta(minutes=5),
             dagrun_timeout=timedelta(minutes=10), tags=["learning_dag"], catchup=False) as dag:

        extract = PythonOperator(
                task_id="extract",
                python_callable=_extract
                )

        extract2 = PythonOperator(
                task_id="extract2",
                python_callable=_extract2,
                op_args = ["{{ var.json.user_info.uname}}"])

        extract_env = PythonOperator(
                task_id="extract_env",
                python_callable=_extract_env
                )
Fetch data based on date
Change date according to the date of execution.
- Using something insde 2 curly braces, we are telling airflow that there is something that has to be executed on runtime.
- We could inject data at runtime by doing this. Example:- in example of task
extractwe used {{}} . - To get a value of a variable of the task run date from a database, we could use this feature. Example using SqliteOperato:
from airflow.providers.sqlite.operators.sqlite import SqliteOperator

fetch_data = SqliteOperator(
        task_id="fetch_data",
        sql = "SELECT uname from user_info where data = {{ ds }}"
    )
ds in above sql statement gives us the date of execution. By saving this file and going to UI, then Graphs and clicking on the task and then rendered, we could see the sql statement updated.

But best practice to do so is by using sql file instead of sql statement and we should pass sql path instead of sql statement.
fetch_data = SqliteOperator(
        task_id="fetch_data",
        sql = "sql/GET_USER_INFO.sql"
    )
Pass parameters with SqliteOperator
For more info about SqliteOperator please follow this link and then here. In line 43 (where template_fields = ('sql', ) is present), it we are currently using only sql but we could use parameters too.
For that, we should create a custom operator using SqliteOperator. And use that operator instead of SqliteOperator.
class CustomSqliteOperator(SqliteOperator):
    template_fields = ('sql', "parameters")

######
######


fetch_data = CustomSqliteOperator(
    task_id="fetch_data",
    sql = "sql/GET_USER_INFO.sql",
    parameters={
        'next_ds': '{{ next_ds }}',
        'prev_ds': '{{ prev_ds }}',
        'uname': '{{ var.json.user_info.uname}}'
    }
)
In above example, we are sending next runtime execution date in next_ds, previous execution data in prev_ds and uname as usual. Something like below should be visible:
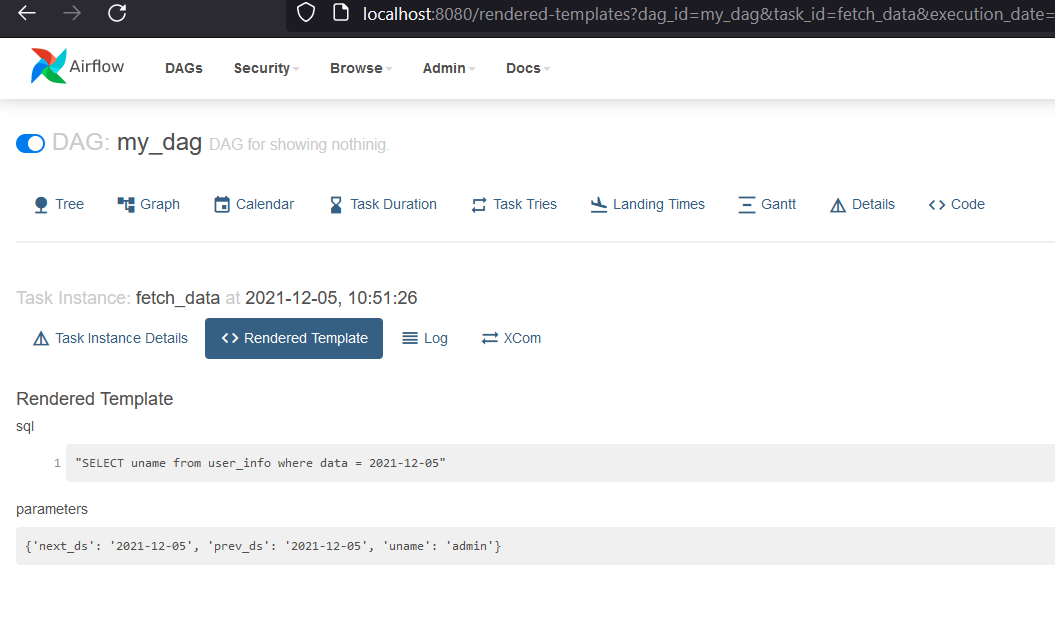
But if we want to send these parameters with default operator, we will not be able to do so.
Sharing Variables/Values Within a Tasks
We have few tasks, extract, extract2, extract_env and fetch_data and if we want to share
variables between extract and extract2, then we should use XCOMs
(According to Airflow, XComs (short for “cross-communications”) are a mechanism that let Tasks talk to each other, as by default Tasks are entirely isolated and may be running on entirely different machines).
- To access variable from another, we should use XCOMs and to use XCOMs, we should use Task Instances.
- By passing
tiin python operator’s callable function, we are automatically accessing a task’s instance. - We could access task’s context by using Task Instance object.
Example
- In below example, in
_extract(ti), we are pushing afile_paththat is extracted fromVariableand its key is `file_path. - In
_extract2(uname, ti)we are pulling afile_pathfromextracttask.
def _extract(ti):

    file_path = Variable.get("data_folder") + "/" + Variable.get("test_df")
    uinfo = Variable.get("user_info", deserialize_json=True)
    print(uinfo, file_path)
    print(uinfo["uname"], uinfo["password"])

    ti.xcom_push(key="file_path", value=file_path)

def _extract2(uname, ti):
    print(ti.xcom_pull(key="file_path", task_ids="extract"))
    print(f"Username: {uname}")
Also, we have to make sure the task extract runs before extract2. To do so, we have to add a line below on the last of file.
extract>>extract2
In UI, by going over Admin>XComs we can see the data.
Limitations
(Referenced from marclamberti.)
- Can we share DataFrame within a tasks? No, because XCOMs has size limitations according to the meta database.
- With SQLite, we are limited to 2GB for a given XCOMs.
- With Postgres, we are limited to 1GB for a given XCOMs.
- With SQL, we are limited to 64KB for a given XCOMs.
Other Ways to Pass Values Between Tasks
Way 2: Using Return
First way is already written above.
Pushing a value is easier than earlier, because we could simply return the value from the callable function. And accessing a value can be done in 2 ways. Either by using key return_value or not using it.
Example
def _extract(ti):

    file_path = Variable.get("data_folder") + "/" + Variable.get("test_df")
    uinfo = Variable.get("user_info", deserialize_json=True)
    print(uinfo, file_path)
    print(uinfo["uname"], uinfo["password"])
    ti.xcom_push(key="file_path", value=file_path)

    return file_path

def _extract2(uname, ti):
    print(ti.xcom_pull(key="file_path", task_ids="extract"))
    print(ti.xcom_pull(task_ids="extract"))
    print(f"Username: {uname}")
Way 3: Handling Multiple Values Passing
Since one push/pull makes one connection, if we want to share more values, we will be making many connections and which is bad ritual. So to avoid such a problem, we could return a JSON value by making a dictionary of data instead.
Example
def _extract(ti):

    file_path = Variable.get("data_folder") + "/" + Variable.get("test_df")
    uinfo = Variable.get("user_info", deserialize_json=True)
    print(uinfo, file_path)
    print(uinfo["uname"], uinfo["password"])

    return {"file_path": file_path, "uname":uinfo["uname"]}

def _extract2(uname, ti):
    print(ti.xcom_pull(task_ids="extract"))
    print(f"Username: {uname}")
TaskFlow API
TaskFlow API allows us to define DAGs in new way by using Decorators and XCOM Args.
Follow this for more info.
Decorators
Some of popular decorators are:
@task.python: Use it on top ofpython_callablefunction instead of making object of PythonOperator to make a task using PythonOperator.@task.virtualenv: To run task within a virtual environment.@task_group: To group multiple tasks and the run it.
XCOM Args
Create a dependencies between two tasks explicitly. Which means that we could share data between two tasks without having to call XCOM Push/Pull.
Example
All are just like above but few changes should be made.
- Define a function
extractlike below and remove our old_extractfunction. - Remove the code to create a task inside a DAG because using decorator, we will be making a task with the name same as function name.
- And on the bottom, instead of
extract >> extract2, useextract() >> extract2.
from airflow.decorators import task

@task.python
def extract():
    file_path = Variable.get("data_folder") + "/" + Variable.get("test_df")
    uinfo = Variable.get("user_info", deserialize_json=True)
    print(uinfo, file_path)
    print(uinfo["uname"], uinfo["password"])
DAG Decorator
Using DAG decorator instead of DAG object.
- Instead of creating a dag using
withkeyword, we will make a decorator and run tasks inside a function.
Example
from airflow.decorators import task, dag

@task.python
def extract():

# def _extract(ti):

    file_path = Variable.get("data_folder") + "/" + Variable.get("test_df")
    uinfo = Variable.get("user_info", deserialize_json=True)
    print(uinfo, file_path)
    print(uinfo["uname"], uinfo["password"])

@task.python
def extract2():
# def _extract2(uname, ti):
    # print(ti.xcom_pull(key="file_path", task_ids="extract"))
    # print(f"Username: {uname}")
    uinfo = Variable.get("user_info", deserialize_json=True)
    print(uinfo)
@dag(description="DAG for showing nothing.",
         start_date=datetime(2021, 1, 1), schedule_interval=timedelta(minutes=5),
         dagrun_timeout=timedelta(minutes=10), tags=["learning_dag"], catchup=False)
def my_dag():

    extract() >> extract2()

md = my_dag()
XCOM Args With TaskFlow API
This is relatively easy.
from airflow.decorators import task, dag

@task.python
def extract():
    return "Extract"

@task.python
def extract2(sms):
    print(sms)

@dag(description="DAG for showing nothing.",
         start_date=datetime(2021, 1, 1), schedule_interval=timedelta(minutes=5),
         dagrun_timeout=timedelta(minutes=10), tags=["learning_dag"], catchup=False)
def my_dag():

    extract2(extract())

md = my_dag()
In above example, we have not defiend a dependency but still, it is automatically generated by Airflow for us. We passed a task as parameter to a depending task and it worked like a charm. But What if we have multiple variables to share?
I will write it in below section.
Grouping DAGs
SubDAGs: Hard Way to Group DAGs
It will get harder to understand what is happening inside once we have lots of DAG Tasks. And at those situations, we could group similar tasks in Airflow using either SubDAGs or TaskGroups. To understand grouping, we will use below example.
@task.python(task_id="extract_uinfo", multiple_outputs=True, do_xcom_push=False)
def extract():
    uinfo = Variable.get("user_info", deserialize_json=True)
    return {"uname":uinfo["uname"],"password":uinfo["password"]}

@task.python
def authenticate(uname, pwd):
    print(uname, pwd)

@task.python
def validate(uname, pwd):
    print(uname, pwd)

@dag(description="DAG for showing nothing.",
         start_date=datetime(2021, 1, 1), schedule_interval=timedelta(minutes=5),
         dagrun_timeout=timedelta(minutes=10), tags=["learning_dag"], catchup=False)
def my_dag():
    uinfo = extract()
    uname, pwd = uinfo["uname"], uinfo["password"]
    validate(uname, pwd)
    authenticate(uname, pwd)

md = my_dag()
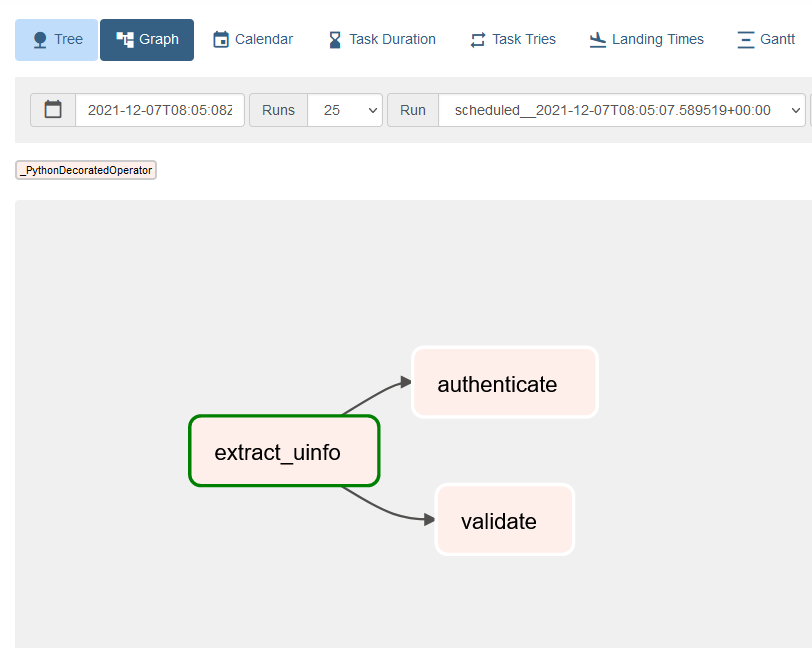
After re-running the scheduler and going to Graph view, we could see something like below where two tasks authenticate and validate are depending on extract_uinfo.
SubDAGs
SubDAG is a DAG within a DAG. We need two components (SubDagOperator and subdag_factory) to use SubDAGs.
We need to import SubDagOperator and subdag_factory is our own module that we will create next.
- Create a new folder
subdag. - Create a new file
subdag_factory.pyinside it.
Inside subdag_factory.py
from airflow.models import DAG
from airflow.decorators import task, dag
from airflow.models import Variable

@task.python
def authenticate(uname, pwd):
    print(uname, pwd)

@task.python
def validate(uname, pwd):
    print(uname, pwd)

def subdag_factory(parent_dag_id, subdag_dag_id, default_args, uinfo):
    with DAG(f"{parent_dag_id}.{subdag_dag_id}", default_args=default_args) as dag:

        uname, pwd = uinfo["uname"], uinfo["password"]

        validate(uname, pwd)
        authenticate(uname, pwd)

    return dag
In our DAG file
from airflow import DAG
from datetime import datetime, timedelta
from airflow.operators.python import PythonOperator
from airflow.models import Variable
from airflow.providers.sqlite.operators.sqlite import SqliteOperator
from airflow.decorators import task, dag
from typing import Dict
from airflow.operators.subdag import SubDagOperator
from subdag.subdag_factory import subdag_factory

default_args = {
    "start_date": datetime(2021, 1, 1)
}

@task.python(task_id="extract_uinfo", multiple_outputs=True, do_xcom_push=False)
def extract():
    uinfo = Variable.get("user_info", deserialize_json=True)
    return {"uname":uinfo["uname"],"password":uinfo["password"]}

@dag(description="DAG for showing nothing.",
         default_args=default_args, schedule_interval=timedelta(minutes=5),
         dagrun_timeout=timedelta(minutes=10), tags=["learning_dag"], catchup=False)
def my_dag():
    uinfo = extract()


    validate_tasks = SubDagOperator(
        task_id = "validate_tasks",
        subdag=subdag_factory("my_dag", "validate_tasks", default_args=default_args, uinfo=uinfo)
    )

md = my_dag()
Few things to note:
- We are using
default_argsas a default argument in both DAGs. It is defined in the top. - We should pass the parent dag id and task dag id CORRECTLY else, error will pop up.
Now restarting a scheduler, we must be seeing a error something like below:
airflow.exceptions.AirflowException: Tried to set relationships between tasks in more than one DAG: dict_values([<DAG: my_dag.validate_tasks>, <DAG: my_dag>])
This is happening because we are using XCOMs in our extract task and TaskFlowAPI tries to make a dependencies automatically.
Now we are trying to setup relationship between task from our DAG and subdag. In simpler way, it is not possible to setup a dependencies
between task in different DAGs. What we should instead do is, use get_current_context.
In our subdag_factory.py
from airflow.models import DAG
from airflow.decorators import task
from airflow.models import Variable
from airflow.operators.python import get_current_context

@task.python
def authenticate():
    ti = get_current_context()["ti"]
    uname = ti.xcom_pull(key="uname", task_ids = "extract_uinfo", dag_id="my_dag")
    pwd = ti.xcom_pull(key="password", task_ids = "extract_uinfo", dag_id="my_dag")

    print(uname, pwd)

@task.python
def validate():
    ti = get_current_context()["ti"]
    uname = ti.xcom_pull(key="uname", task_ids = "extract_uinfo", dag_id="my_dag")
    pwd = ti.xcom_pull(key="password", task_ids = "extract_uinfo", dag_id="my_dag")

    print(uname, pwd)

def subdag_factory(parent_dag_id, parent_task_id, default_args):
    with DAG(dag_id=f"{parent_dag_id}.{parent_task_id}", schedule_interval="@daily",
             default_args=default_args) as dag:
        validate()
        authenticate()

    return dag
In our DAG file
from airflow import DAG
from datetime import datetime, timedelta
from airflow.operators.python import PythonOperator
from airflow.models import Variable
from airflow.providers.sqlite.operators.sqlite import SqliteOperator
from airflow.decorators import task, dag
from typing import Dict
from airflow.operators.subdag import SubDagOperator
from learning_project_DAG.subdag.subdag_factory import subdag_factory


default_args = {
    "start_date": datetime(2021, 1, 1)
}

@task.python(task_id="extract_uinfo", multiple_outputs=True, do_xcom_push=False)
def extract():
    # uinfo = Variable.get("user_info", deserialize_json=True)
    uinfo = {"uname":"John Doe", "password": "abcde"}
    return {"uname":uinfo["uname"],"password":uinfo["password"]}
@dag(description="DAG for showing nothing.",
         default_args=default_args, schedule_interval="@daily", #timedelta(minutes=5)
         dagrun_timeout=timedelta(minutes=10), tags=["learning_dag"], catchup=False)
def my_dag():

    validate_tasks = SubDagOperator(
        task_id = "validate_tasks",
        subdag=subdag_factory(parent_dag_id="my_dag",
                              parent_task_id="validate_tasks",
                              default_args=default_args),
        default_args=default_args
    )

    extract() >> validate_tasks

md = my_dag()
Few changes has been made than the previous steps:
- Used
get_current_contextto get the XCOM values from theextracttask. - Made each of sub tasks to use
get_current_contextfor receiving values. - Used
@dailyinstead of every 5 minutes inschedule_interval
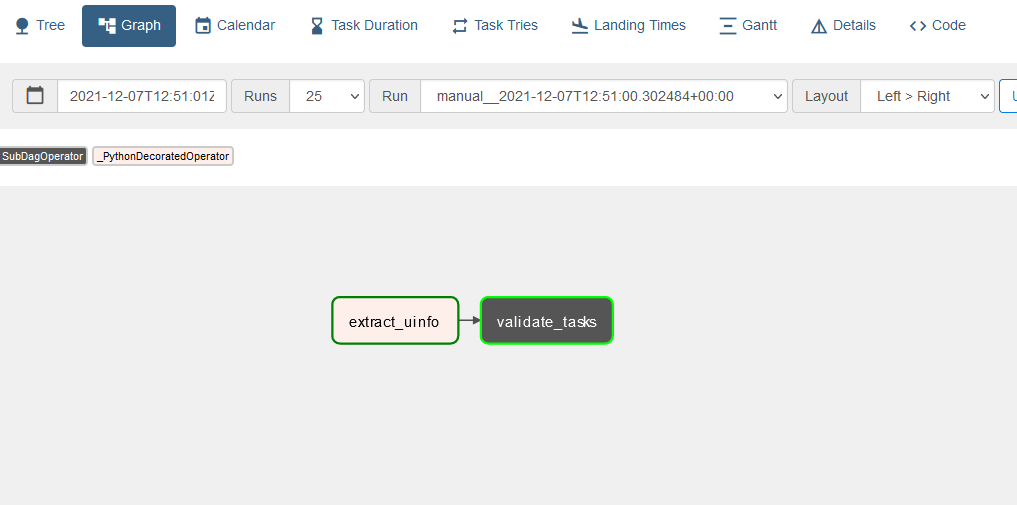
Now we could see something like below in Graph view:
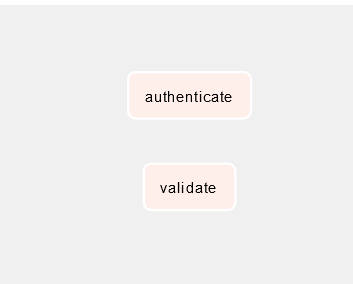
Click on validate_task > Zoom Into Sub DAG > Graph:
Using SubDAG will not always run smoothly and this happened to me while writing this blog. Something strange happened, my scheduler was becoming offline and tasks under a sub DAG were frozen at either running or scheduler state. But when I restarted scheduler, stucked tasks were running fine however, new tasks were again stuckked.
For more about SubDAGs, Astronomer has a great content.
TaskGroups: Best Way to Group DAGS
TaskGroups are much more easier that SubDAG to group tasks together in the context of time to create and performance.
Differences Between SubDAG and TaskGroup
- Main difference is that we group our task visually in TaskGroup.
- We don’t have to do anything like SubDAG.
Example
from airflow import DAG
from airflow.operators.python import PythonOperator
from airflow.models import Variable
from airflow.providers.sqlite.operators.sqlite import SqliteOperator
from airflow.decorators import task, dag
from airflow.operators.subdag import SubDagOperator
from airflow.utils.task_group import TaskGroup

from datetime import datetime, timedelta
from typing import Dict


default_args = {
    "start_date": datetime(2021, 1, 1)
}

@task.python(task_id="extract_uinfo", multiple_outputs=True, do_xcom_push=False)
def extract():
    uinfo = {"uname":"John Doe", "password": "abcde"}
    return {"uname":uinfo["uname"],"password":uinfo["password"]}

@task.python
def authenticate(uname, pwd):
    print(uname, pwd)

@task.python
def validate(uname, pwd):
    print(uname, pwd)

@dag(description="DAG for showing nothing.",
         default_args=default_args, schedule_interval="@daily", #timedelta(minutes=5)
         dagrun_timeout=timedelta(minutes=10), tags=["learning_dag"], catchup=False)
def my_dag():
    uinfo = extract()
    uname = uinfo["uname"]
    pwd = uinfo["password"]

    with TaskGroup(group_id="validate_tasks") as validate_tasks:
        validate(uname, pwd)
        authenticate(uname, pwd)
md = my_dag()
Few new things we did are:
- Imported TaskGroup.
- Copied and pasted
authenticateandvalidatefunction fromsubdag_factory.pyand made changes like receiving uname and password. - Made an instance of
TaskGroupand given itgroup_id. - Called tasks inside it.
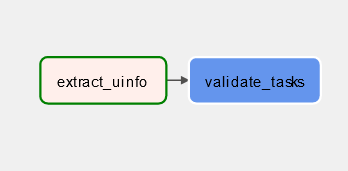
Going over UI then Graph we could see something like below:
Then clicking on the validate_tasks we could see something like below:
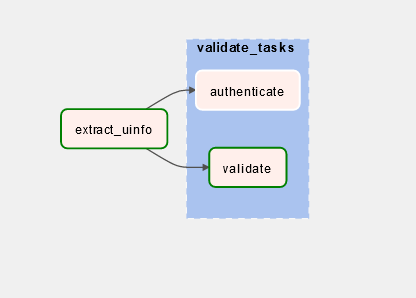
If we triggered the DAG, tasks will run smoothly. And our code is much smaller and easier to read.
Making DAG more Cleaner
Create groups folder and then Create validate_tasks.py in groups folder.
from airflow.utils.task_group import TaskGroup
from airflow.decorators import task

@task.python
def authenticate(uname, pwd):
    print(uname, pwd)

@task.python
def validate(uname, pwd):
    print(uname, pwd)

def validate_tasks(uinfo):
    with TaskGroup(group_id="validate_tasks") as validate_tasks:
        uname = uinfo["uname"]
        pwd = uinfo["password"]
        validate(uname, pwd)
        authenticate(uname, pwd)
In Our DAG file,
from airflow.decorators import task
from validate_tasks import validate_tasks

default_args = {
    "start_date": datetime(2021, 1, 1)
}

@task.python(task_id="extract_uinfo", multiple_outputs=True, do_xcom_push=False)
def extract():
    # uinfo = Variable.get("user_info", deserialize_json=True)
    uinfo = {"uname":"John Doe", "password": "abcde"}
    return {"uname":uinfo["uname"],"password":uinfo["password"]}

@dag(description="DAG for showing nothing.",
         default_args=default_args, schedule_interval="@daily", #timedelta(minutes=5)
         dagrun_timeout=timedelta(minutes=10), tags=["learning_dag"], catchup=False)
def my_dag():
    uinfo = extract()
    validate_tasks(uinfo)

my_dag()
Task Group Within a Task Group
We can achieve this by defining another task group inside a existing task group. In above example, my task group is validate_tasks. Now I want to create another task group inside it.
Call it checks. It will check the value of uname and password before passing it to validate and authenticate.
In validate_taska.py
from airflow.utils.task_group import TaskGroup
from airflow.decorators import task

@task.python
def authenticate(uname, pwd):
    print(uname, pwd)

@task.python
def validate(uname, pwd):
    print(uname, pwd)

@task.python
def check_uname(uname):
    print(f"Entered Uname: {uname}")

@task.python
def check_password(pwd):
    print(f"Entered Password: {pwd}")

def validate_tasks(uinfo):
    with TaskGroup(group_id="validate_tasks") as validate_tasks:

        uname = uinfo["uname"]
        pwd = uinfo["password"]

        with TaskGroup(group_id="checks") as checks:
            check_uname(uname)
            check_password(pwd)

        checks >> validate(uname, pwd)
        checks >> authenticate(uname, pwd)
    return validate_tasks
Or we could even use taskgroup decorator to make a task group. First import task_group decorator from decorators. Then use it like below.
First we have to remove the with.. line to create task group and put below code.
@task_group(group_id="validate_tasks")
def validate_tasks():
In DAG file
@dag(description="DAG for showing nothing.",
         default_args=default_args, schedule_interval="@daily", #timedelta(minutes=5)
         dagrun_timeout=timedelta(minutes=10), tags=["learning_dag"], catchup=False)
def my_dag():
    uinfo = extract()
    validate_tasks(uinfo)
And in our Graph view, we could see something like below:
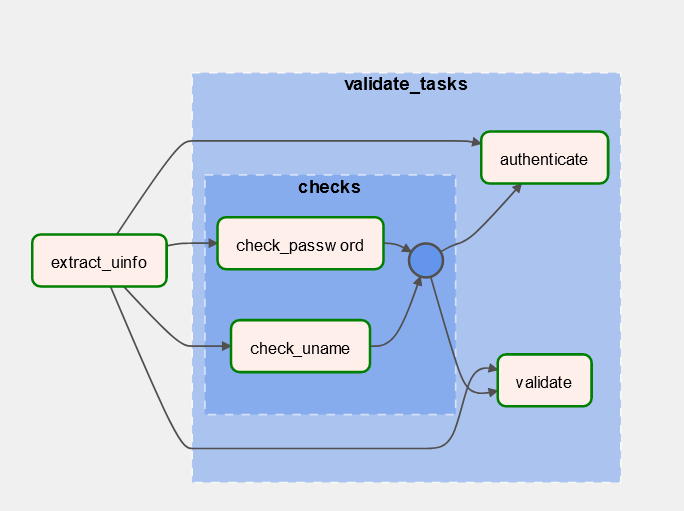
To avoid making this blog long, a blog about dynamic tasks is available at here.


Comments